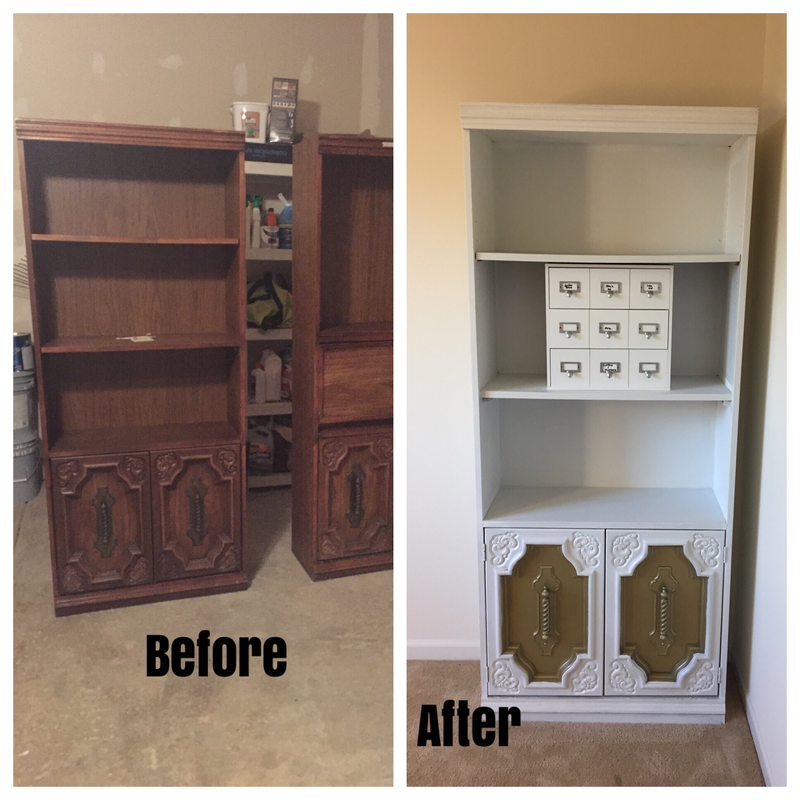
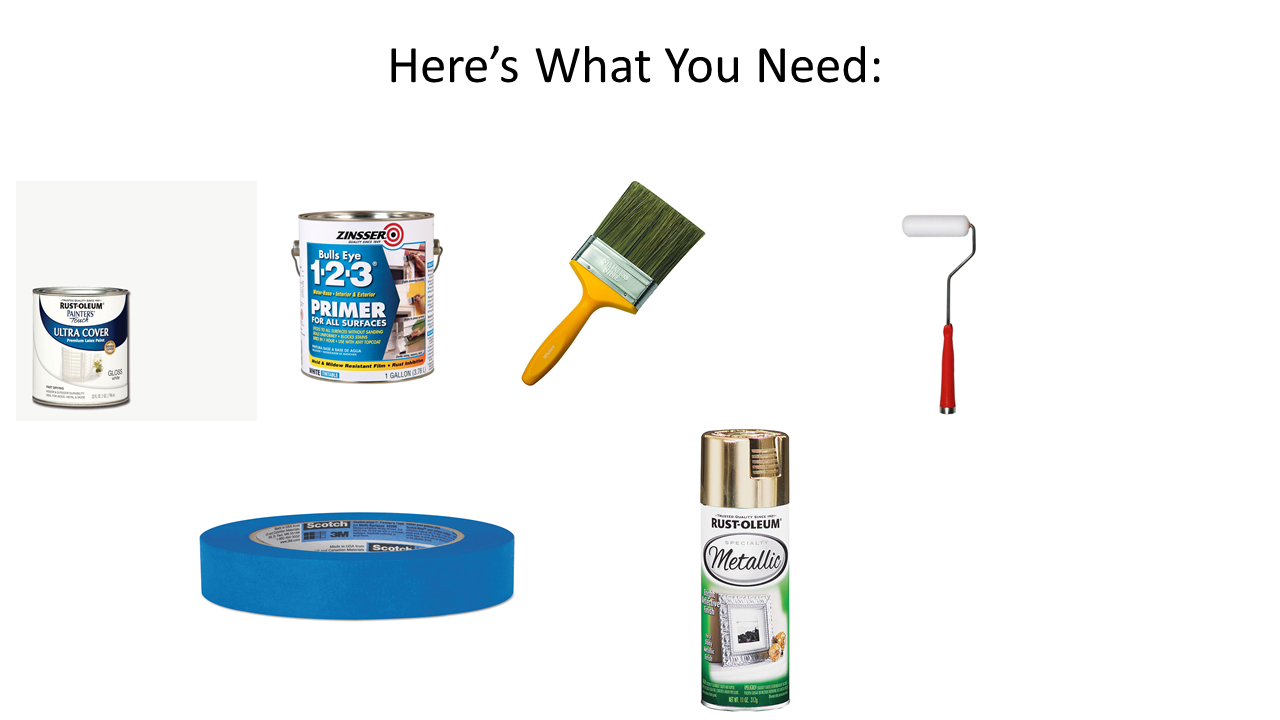
  Hey guys! Today I am going to take you through the process of flipping a good will book case. 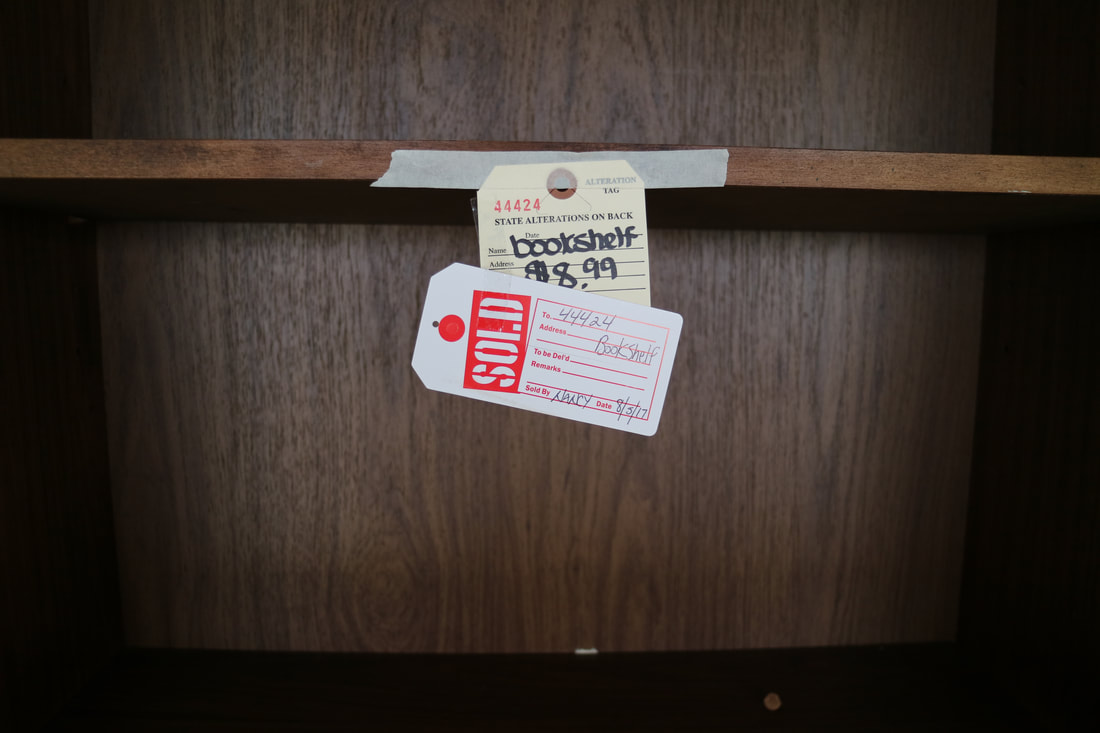 I brought these book cases from my local Goodwill for $8.99 each!!!!! I was so excited about this. I have been on the hunt for more storage for my craft room. 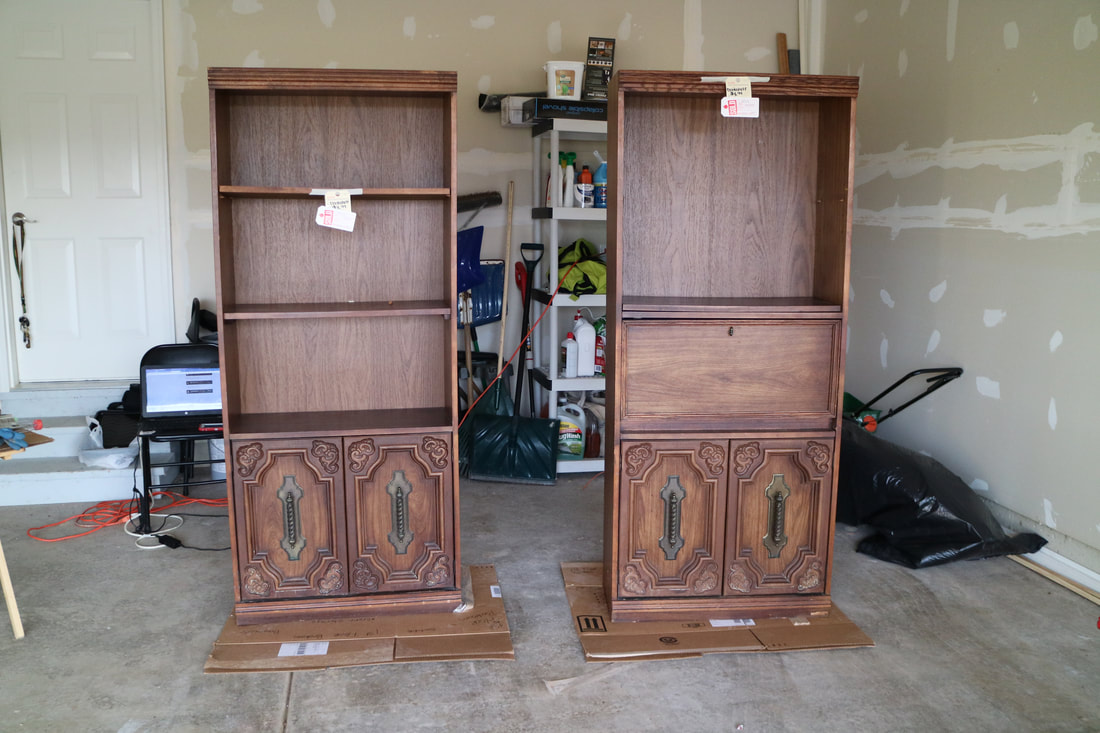 I did not get any pictures of me priming and painting. I jumped right into the project and total forgot. Please forgive me! I will walk you through the steps of what I did. 1. I cleaned both bookcases. They were both very dusty and had a lot of dirt. 2. I primed the entire bookcase. (You can skip this step if you use chalk paint) 3. I let the primer dry overnight and started to paint the next day. 4. I did not use my sprayer although I should have! I made sure all my strokes were even coats. It took 2 coats to get the desired look I wanted. 5. I taped off the bottom of the bookcase and used gold spray paint. If you get spray paint on the other parts just get a small paint brush and do touch ups. 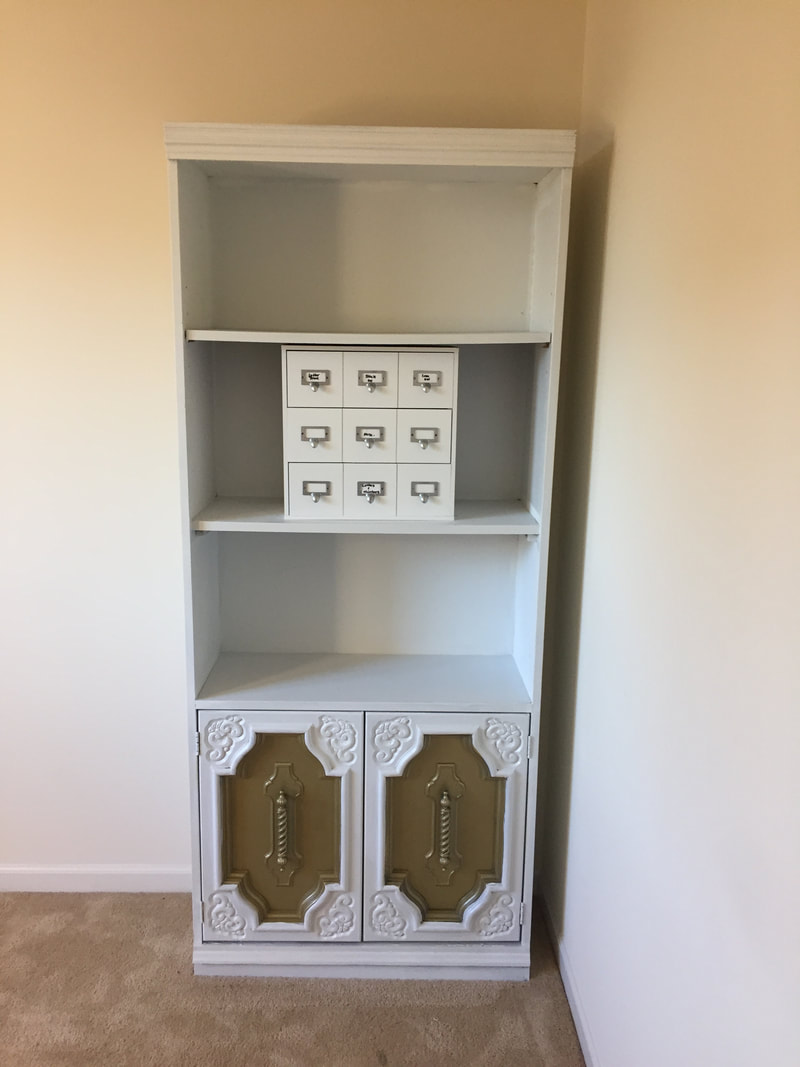 I love the way the bookcase came out! I think if I do this again with other older pieces I will be using chalk paint to cut down on my time. 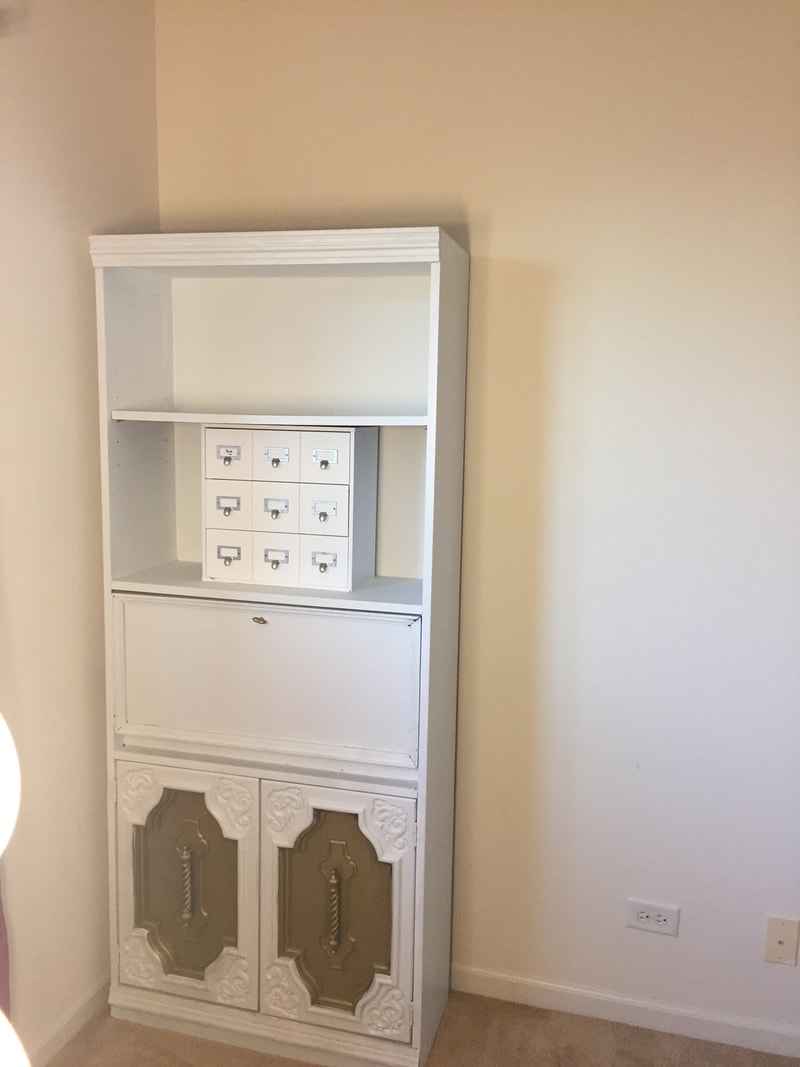 Do you like this project? Let me know and I will see you next time!
XOXO, Shani
1 Comment
Hey guys!!! I know it's been a long time..BUT we're BACK!!! We had a number of life changes that occurred since the last time I posted. I am so excited to be back! We have learned so much during our time away and will be making improvements to our videos and blogs! We have tons of material already recorded and will be back to updating more frequently. I wanted to catch up with you guys before I started today's blog. My grandmother turned 75 this year and had a big party. I wanted to make a backdrop that I have seen online several times. Zo (husband) and I decided that we could build a backdrop ourselves and do it on a budget. We spent a total of $45 for this project!!!! I was very happy about that! Here's what you need:  Supply List Details: 1. Drill 2. 2-2X4's and 6- 1x4's 3. Wood screws ( we used 3 inch) 4. Faux grass (my mom picked this up from Menards) $14 5. Cardboard 6. Staple Gun 7. Stencil 8. Spray Paint 9. Faux Flowers (3 bunches from dollar tree) Total Cost: $50 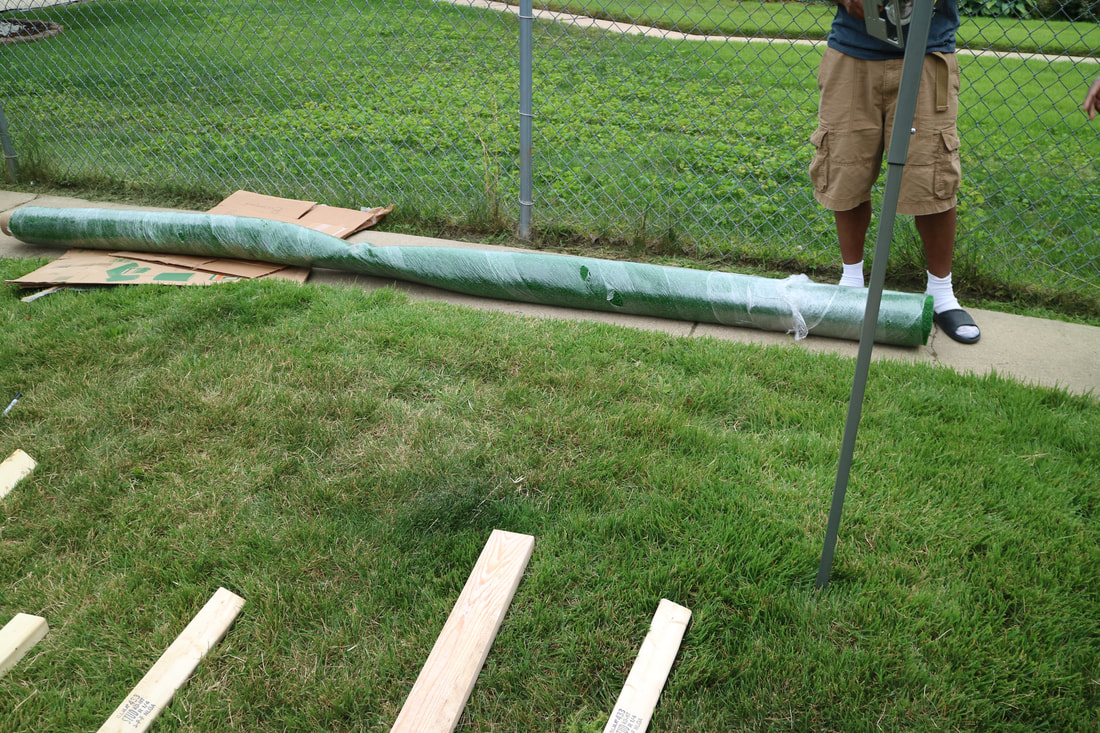 Here is the faux grass we got from Menards. We used about 6 feet of this. 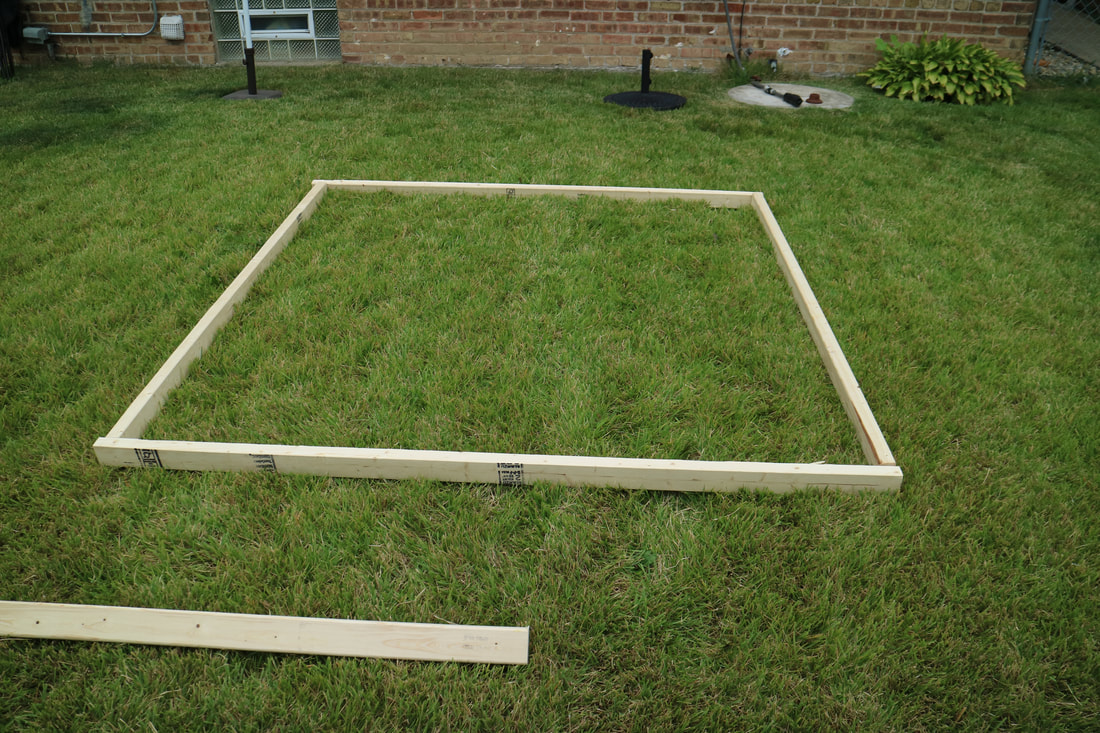 We used (2) 6ft 2x4's as the height. We used (2) 5 ft 1x4's for the width. You want to make the shape of a square. 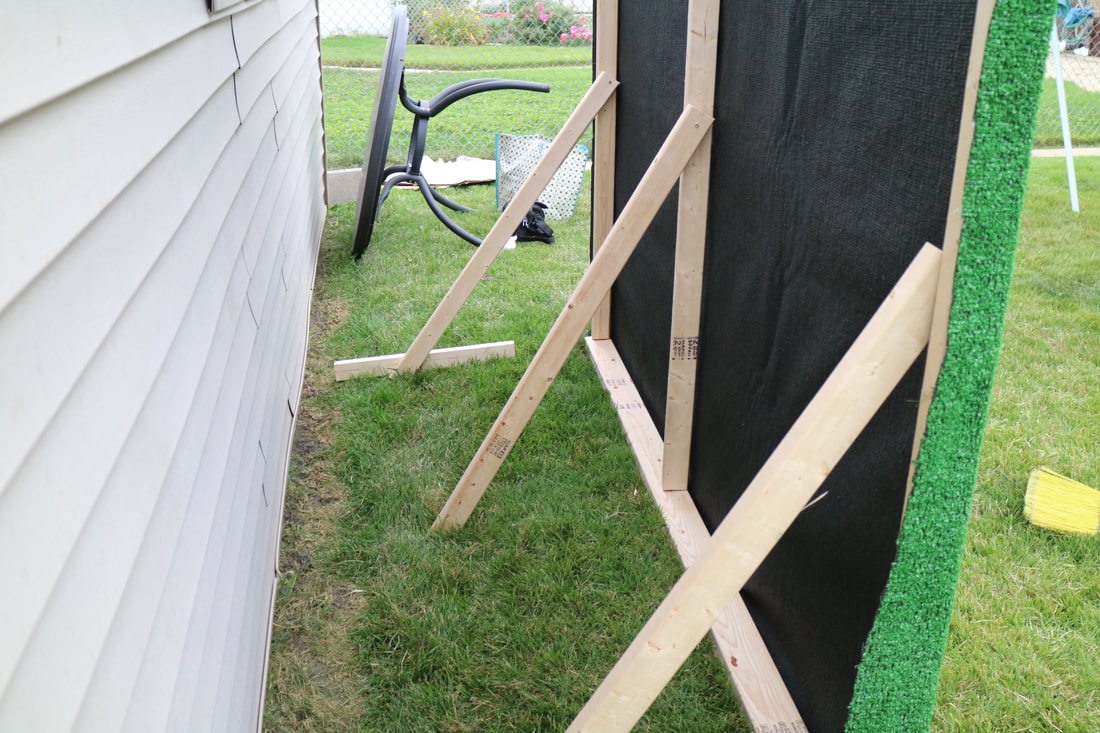 The next step which is not pictured is stapling the faux grass to the wood. After this step, we decided add legs to the back of the frame. We cut the 1x4's down to about 3 feet. We attached it to wood of the frame. My husband wanted more reinforcement and added an arm to the leg which is about 2 feet. 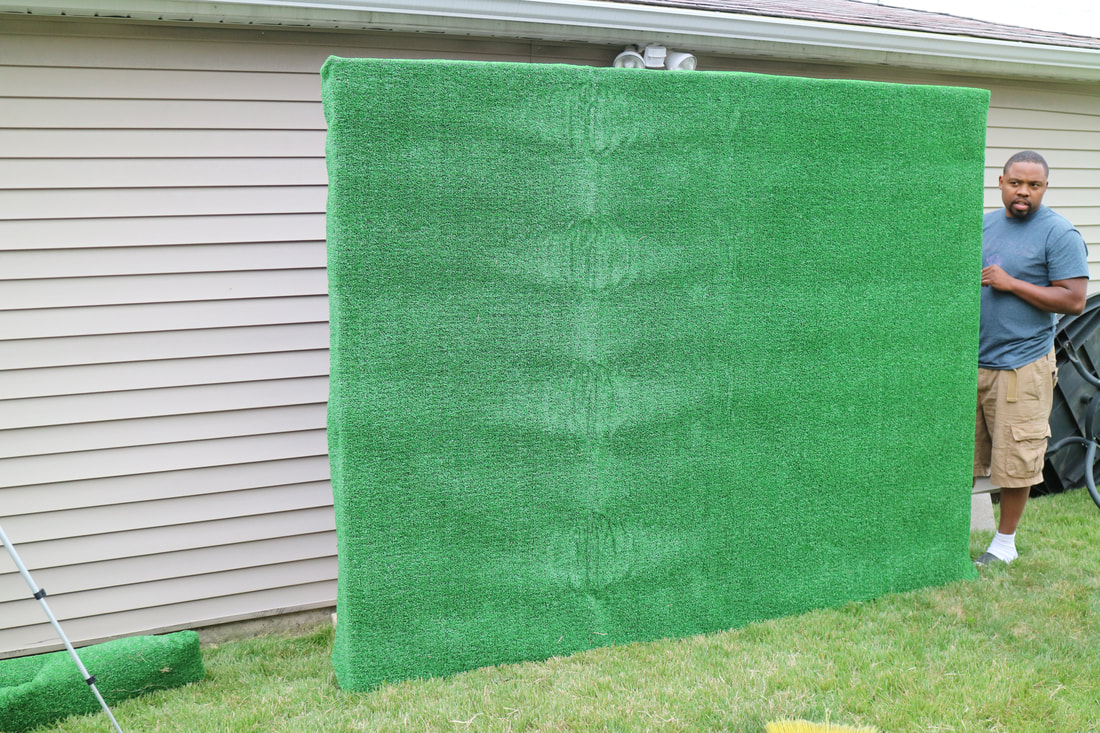 This is what your back drop should look like after you staple it to the wood. Now you are free to decorate as you please. 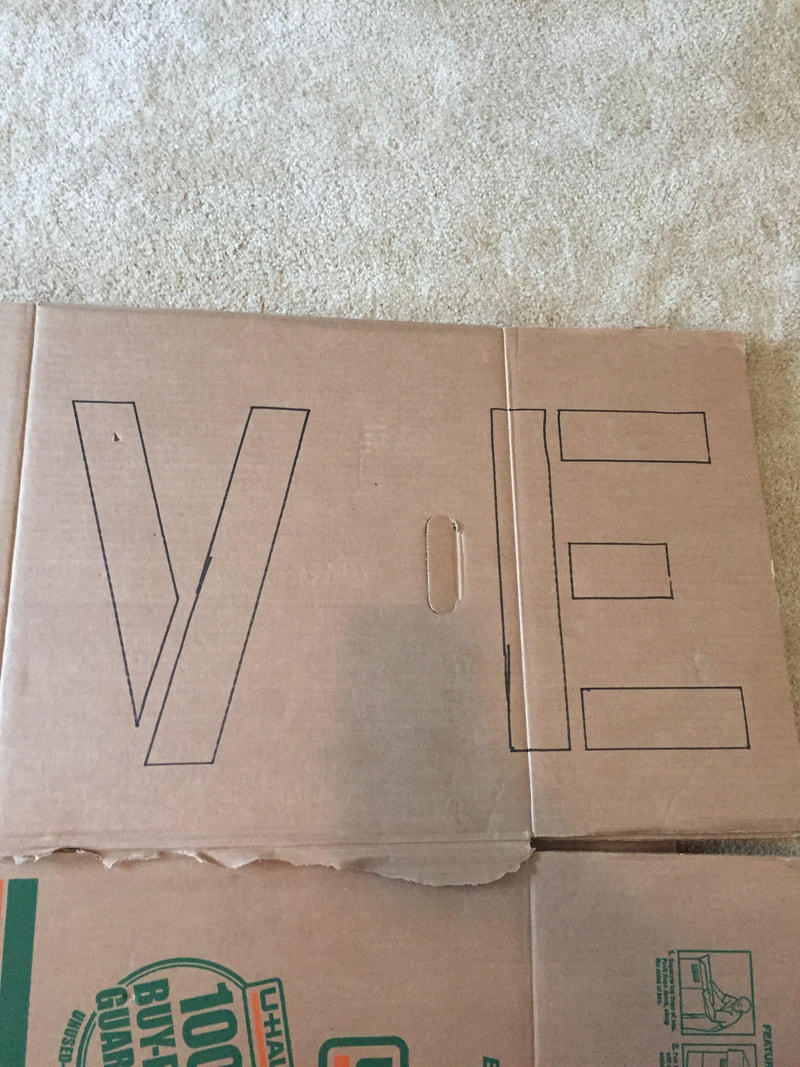 Sooo... Since this was a temporary backdrop I decided to go the cheap route for the letters. I purchased stencil from Menards. I traced the stencil on to cardboard and cut it out. Once I cut the letters out I spray painted them with gold spray paint. 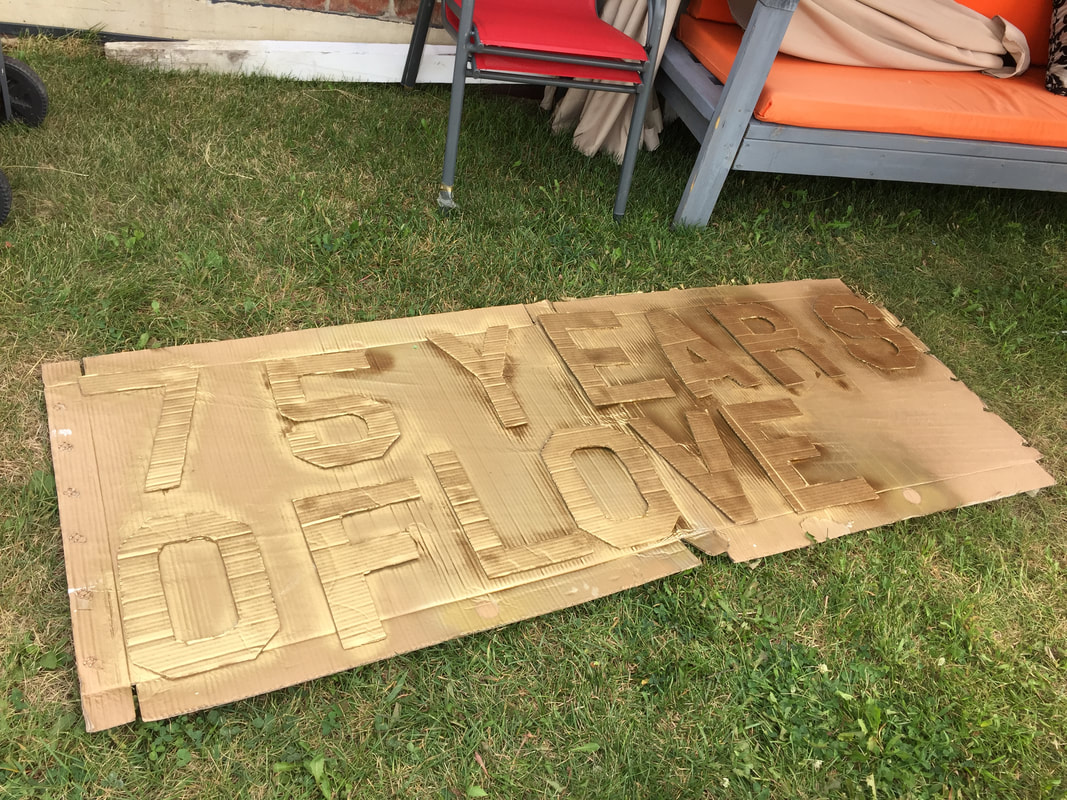  I added dollar tree faux flowers to the corner. I stapled the flowers to the backdrop. I also used double sided tape to attach the letters.
I hope you enjoyed this project!! I will see you next time!!! XOXO, Shani Hi Guys!! Can you believe its Spring???? I know it's been a while! My hubby and I have so many life changes going on. I can't wait to share them all very soon! Please continue to hang in there with me even though my post haven't been as frequent. Chicago's weather has been great so hubby and I decided to give our flower bed a much needed makeover. Neither one of us has a green thumb but we figured it out. I also think we did well for our first time as landscapers. 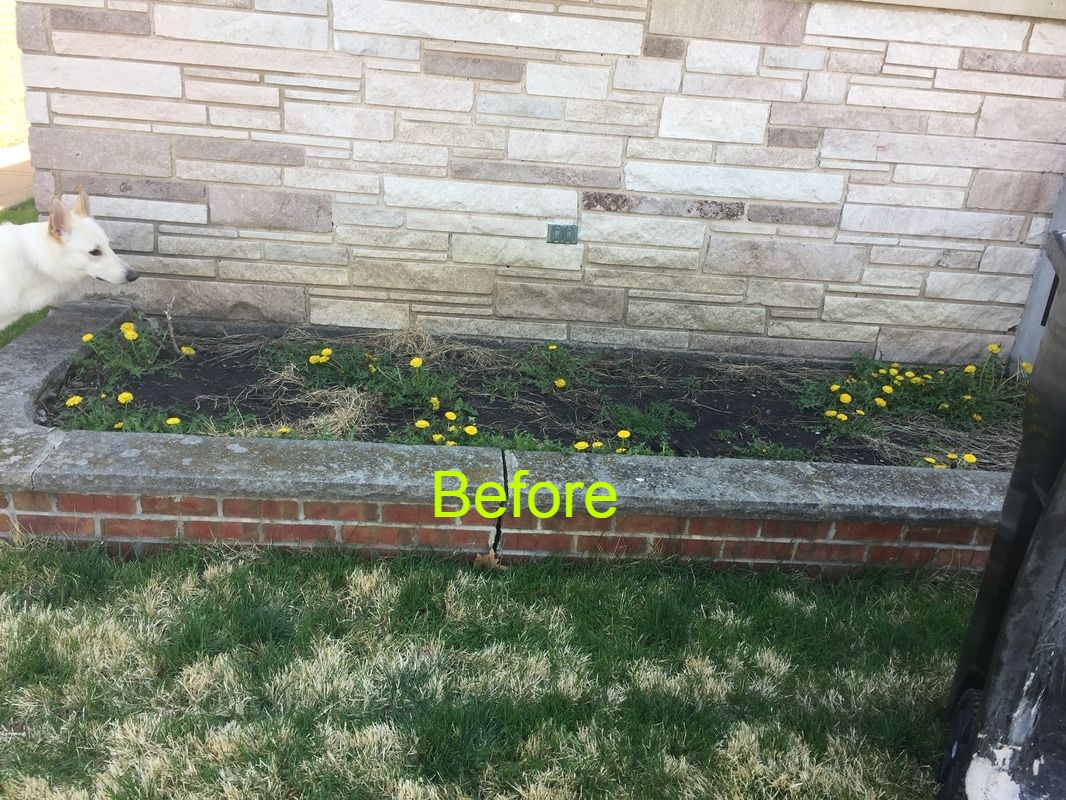 This is the before... so embarassing. We totally neglected this flower bed and focused a lot on the inside of the house. This is the before... so embarassing. We totally neglected this flower bed and focused a lot on the inside of the house. 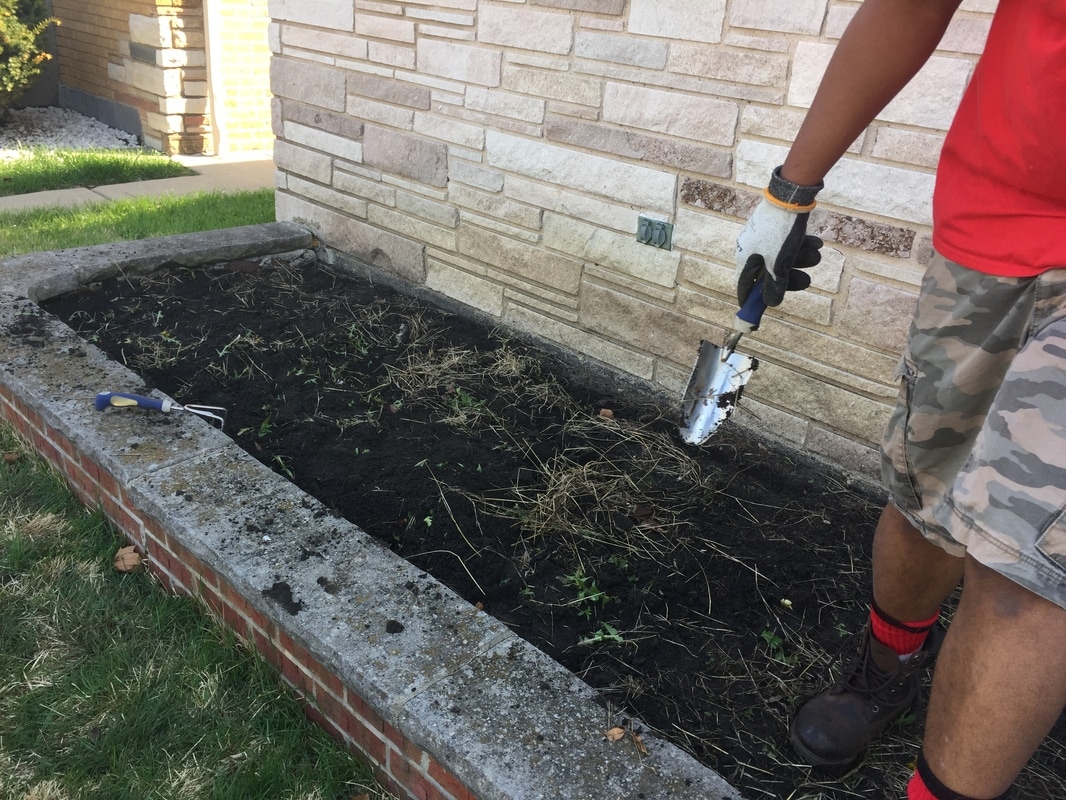 The first thing we did was dig up all the weeds. We had so many!! 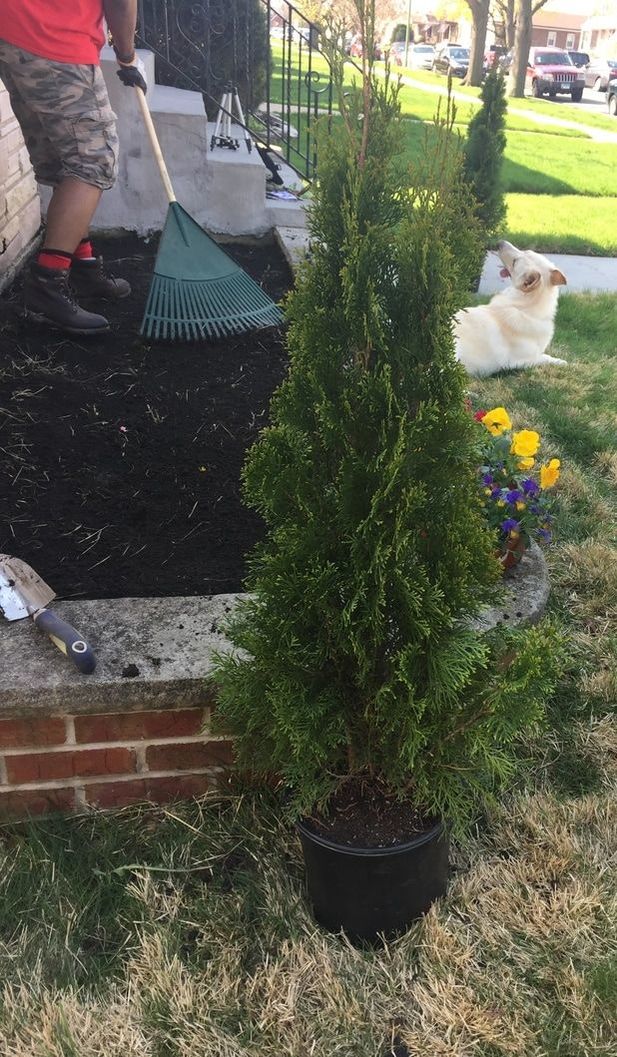 It took us about 45 minutes to pull all the weeds. Once that was complete we raked and turned over the soil. 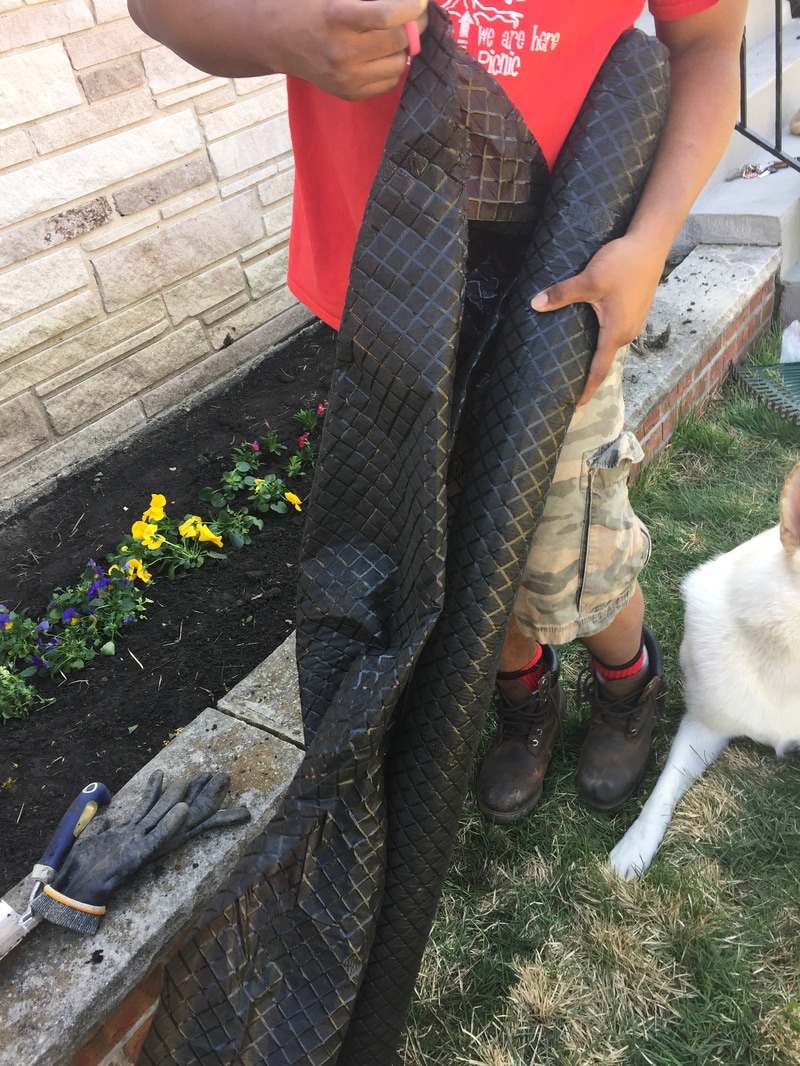 The next we did was put down Vigoro 40 in. x 36 ft. Natural Weed Block. It was $15 from Home Depot. 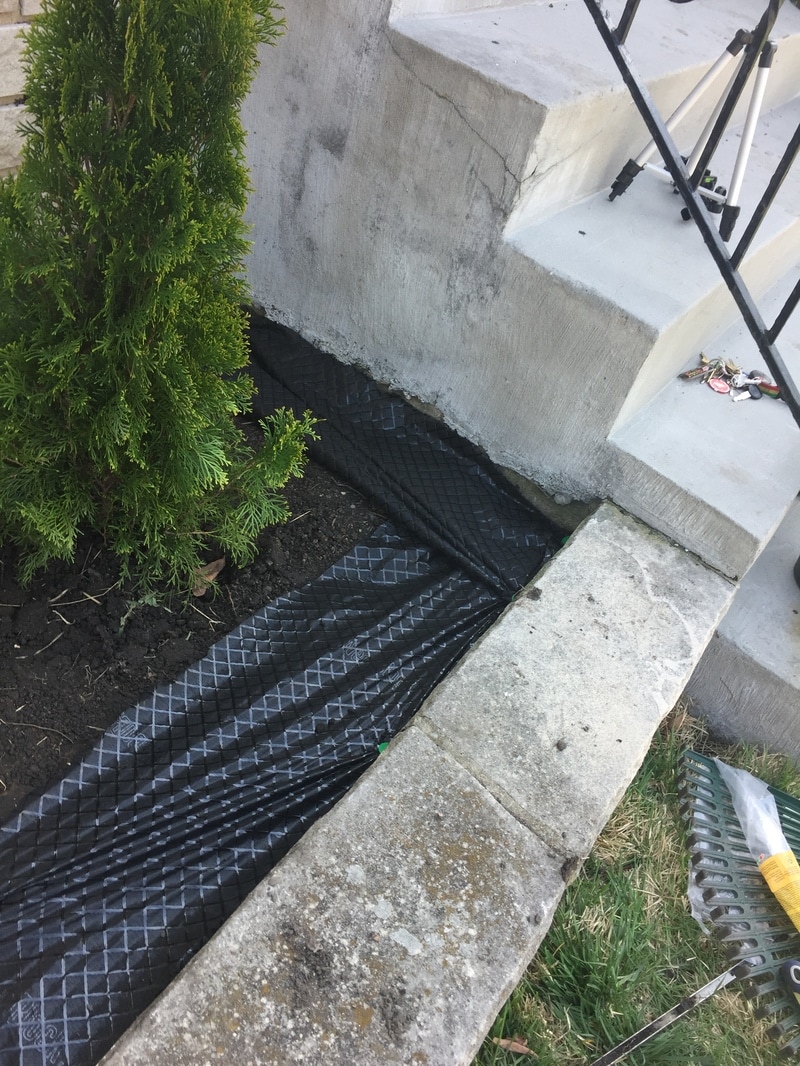 We planted the bushes and flowers first before we put down the weed block. 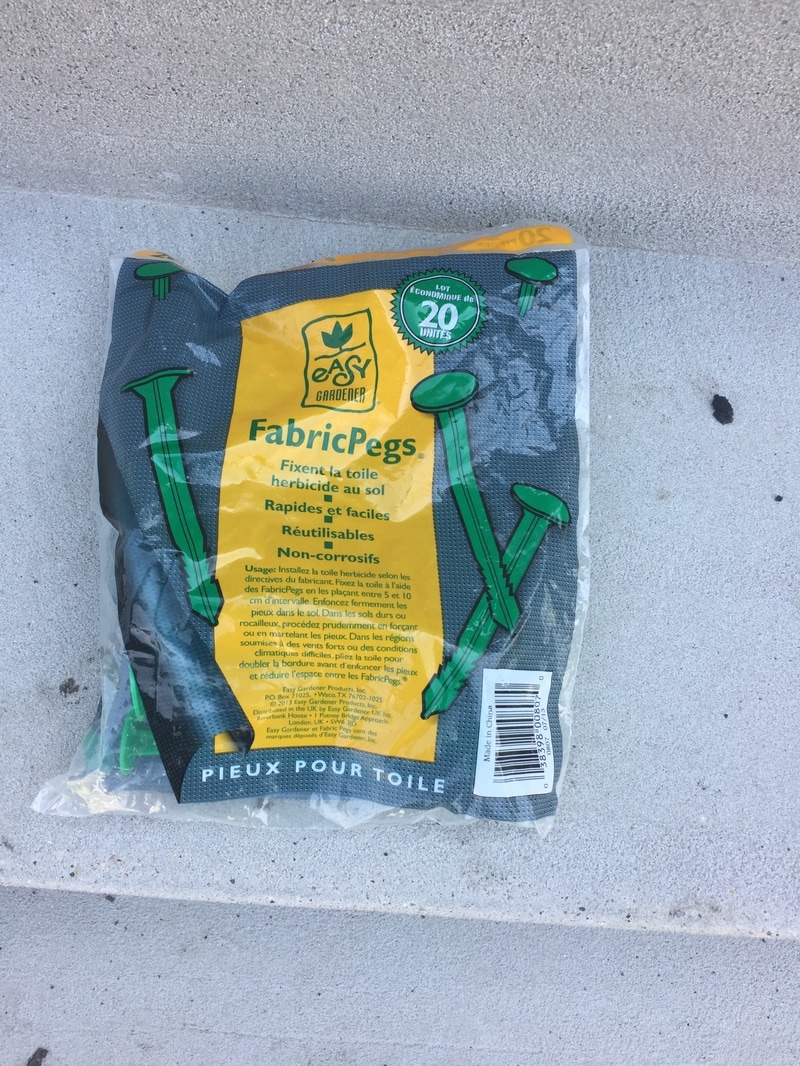 We used these fabric pegs to hold the weed block in place. We only needed one bag because a lot of the weed block fabric overlapped. 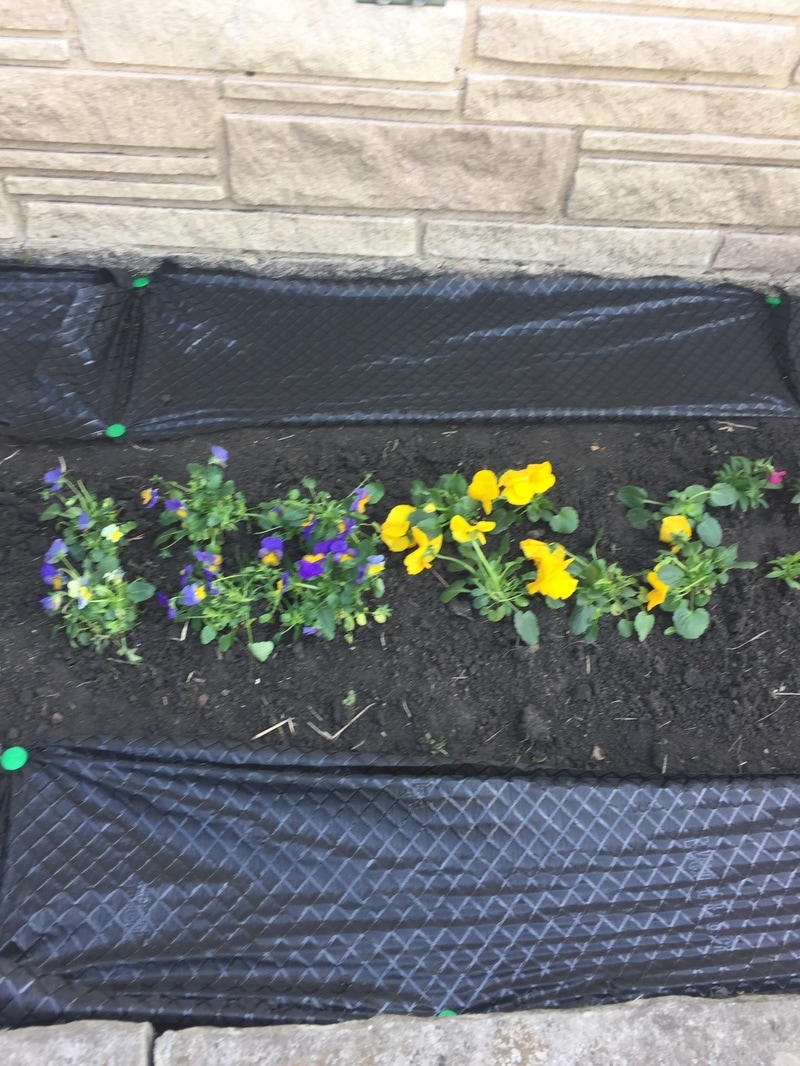 For the flowers we kept it super simple and cheap. 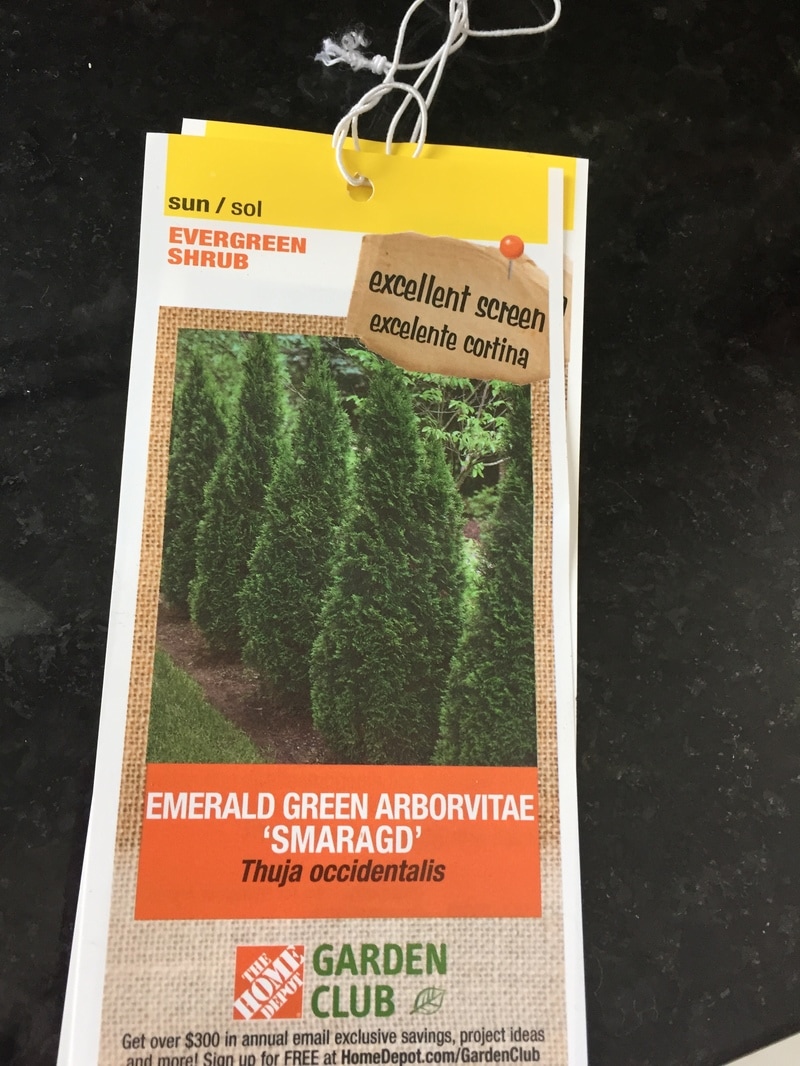 Here are the bushes we used. We purchased two and they were 19.99 each. 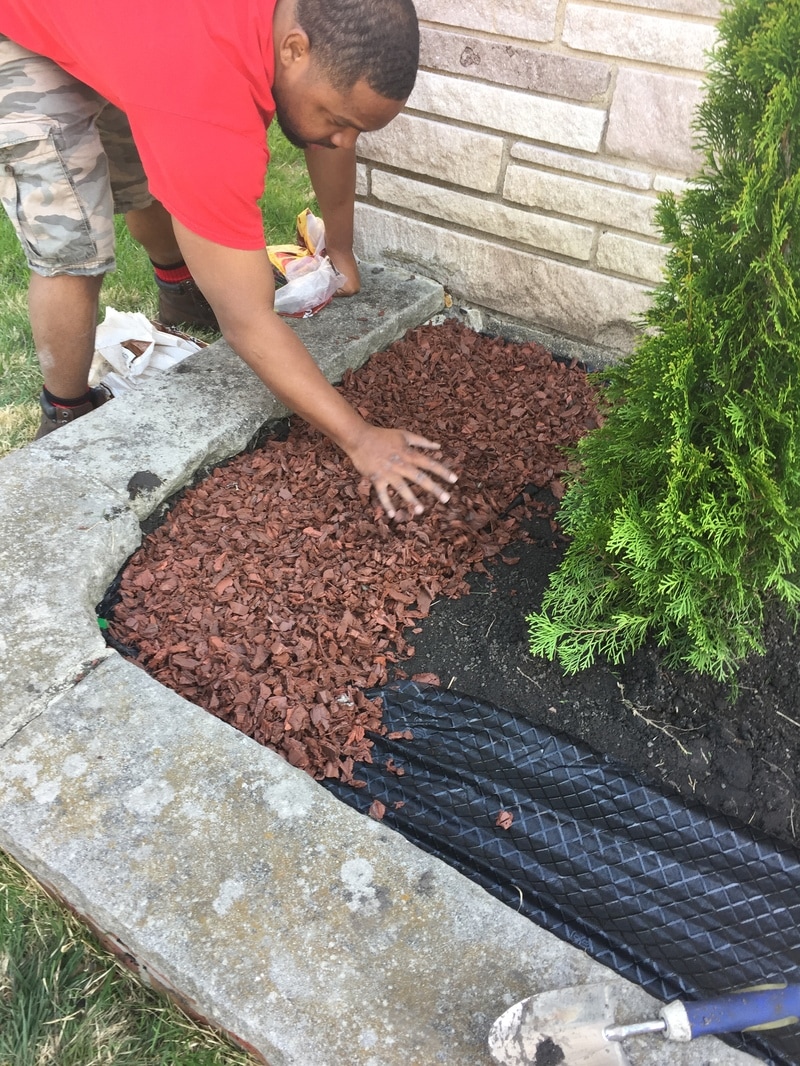 After all the weed block was laid down we used rubberized mulch. The mulch was about $6 a bag. We purchased 6 bags. We went with rubberized mulch before the regular mulch tends to blow everywhere. 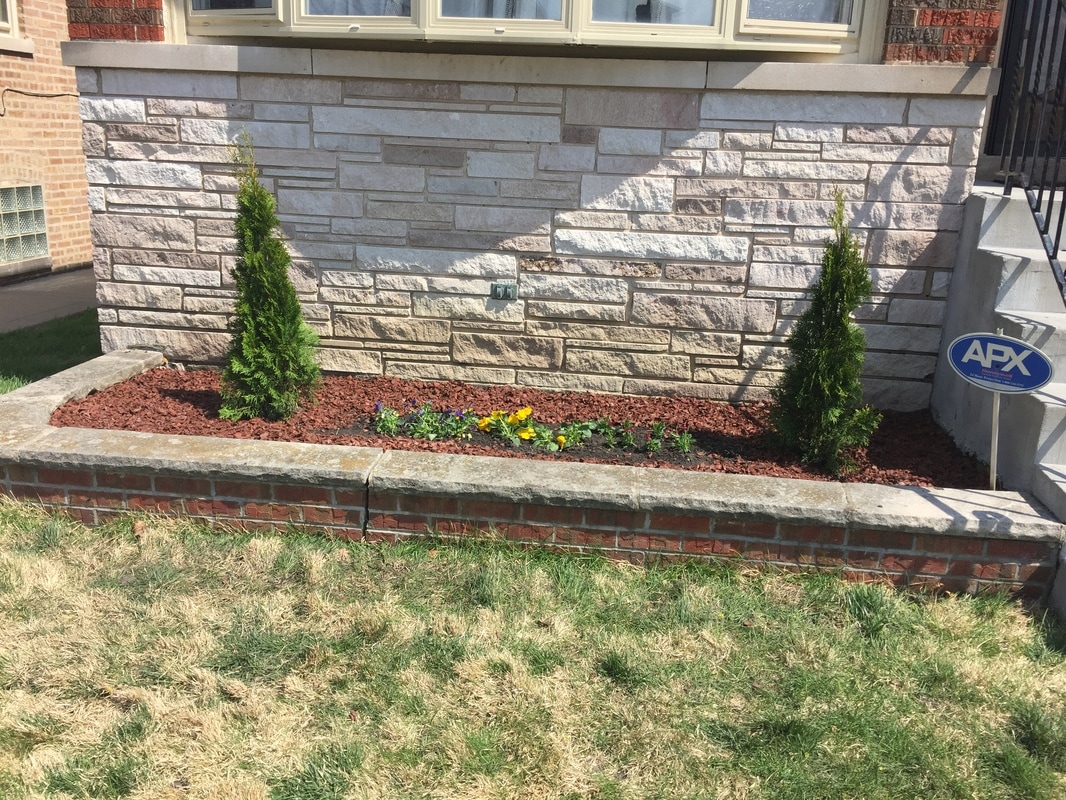 Here is the after!! Also, our grass is almost green again.... Every year we deal with this grass issue. I think we did really well for our first time. I would like to start working on flowers for our back yard next. Total Cost: $120.00 (includes: mulch, weed blocker fabric, flowers. bushes, and top soil .
Thank you guys for coming back to visit my blog. Also, if you have suggestions for projects you would like to see please let me know. Hi guys!! Spring is here which means Wedding Season is here!! The next few blogs will focus on inexpensive wedding decor. I will also have my YouTube videos posted under the wedding tab of this blog. If you have been following this blog for a while then you know that I am a huge saver. I do not pay retail!! If I can't find things for the price I want to pay then I will create it myself for a great price! When planning my wedding I knew that I did not want to spend a ton of money. The most important thing to me was our honeymoon (which is something that I didn't mind splurging on)! My husband and I had a very short engagement (4 months) before we got married. We had little time to plan and save so I began to get really creative!!! I stalked pinterest and YouTube for ideas. I will be sharing with you some of the things I used at my wedding and I hope you find inspiration from them. Weddings DO NOT have to be super expensive to be nice and glamorous! I will show you have. 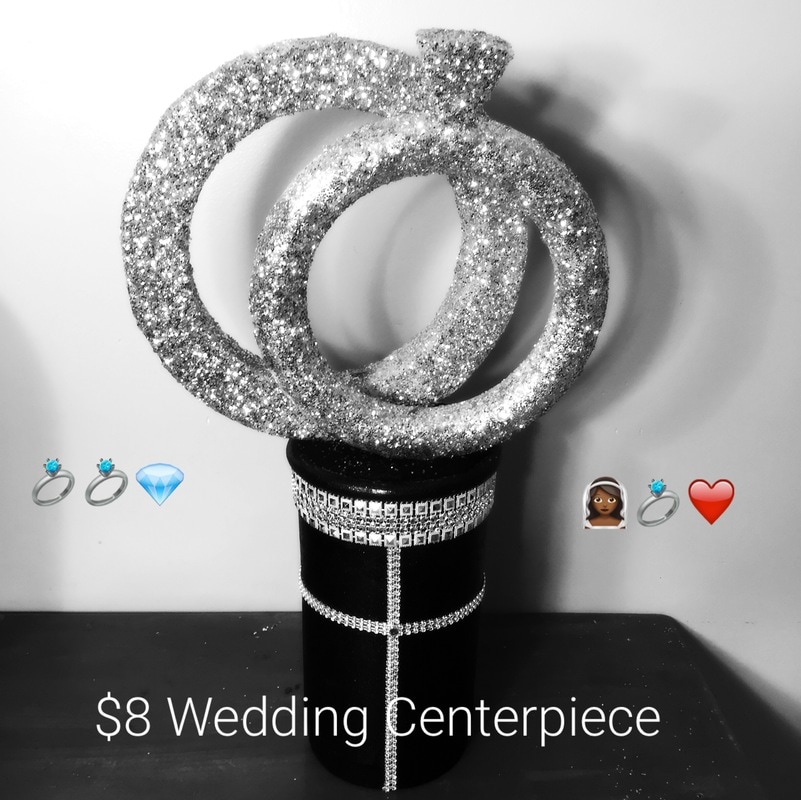 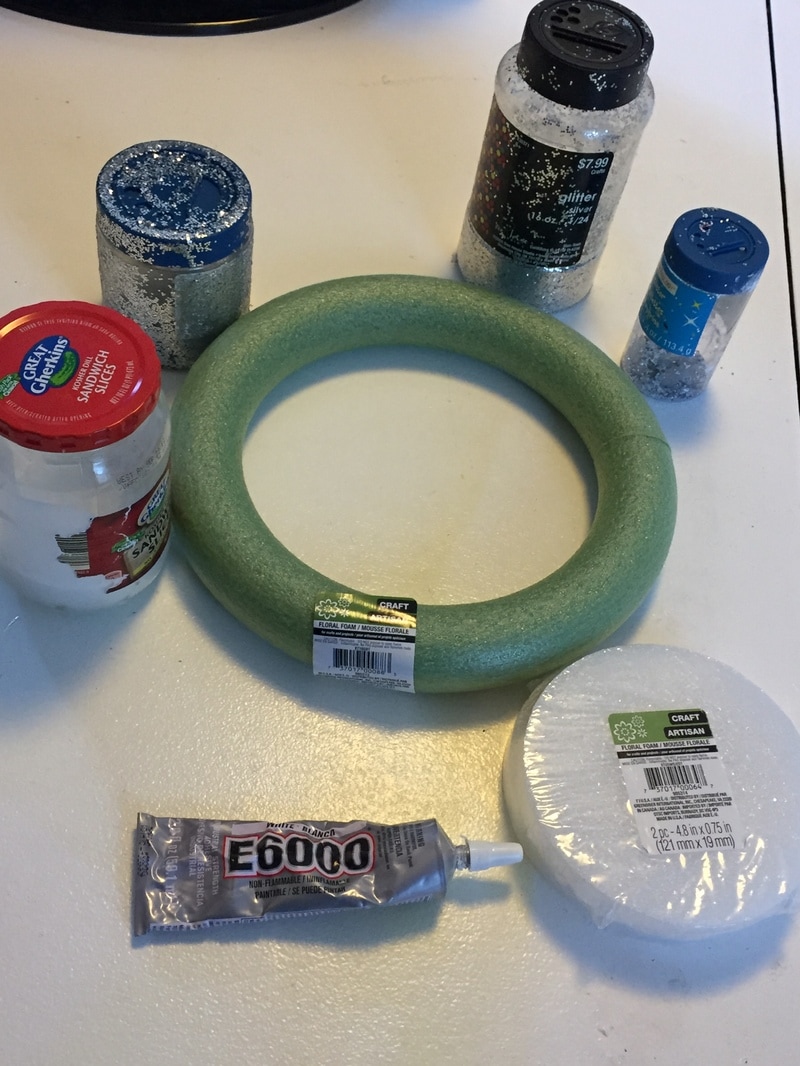 Here is what you need:
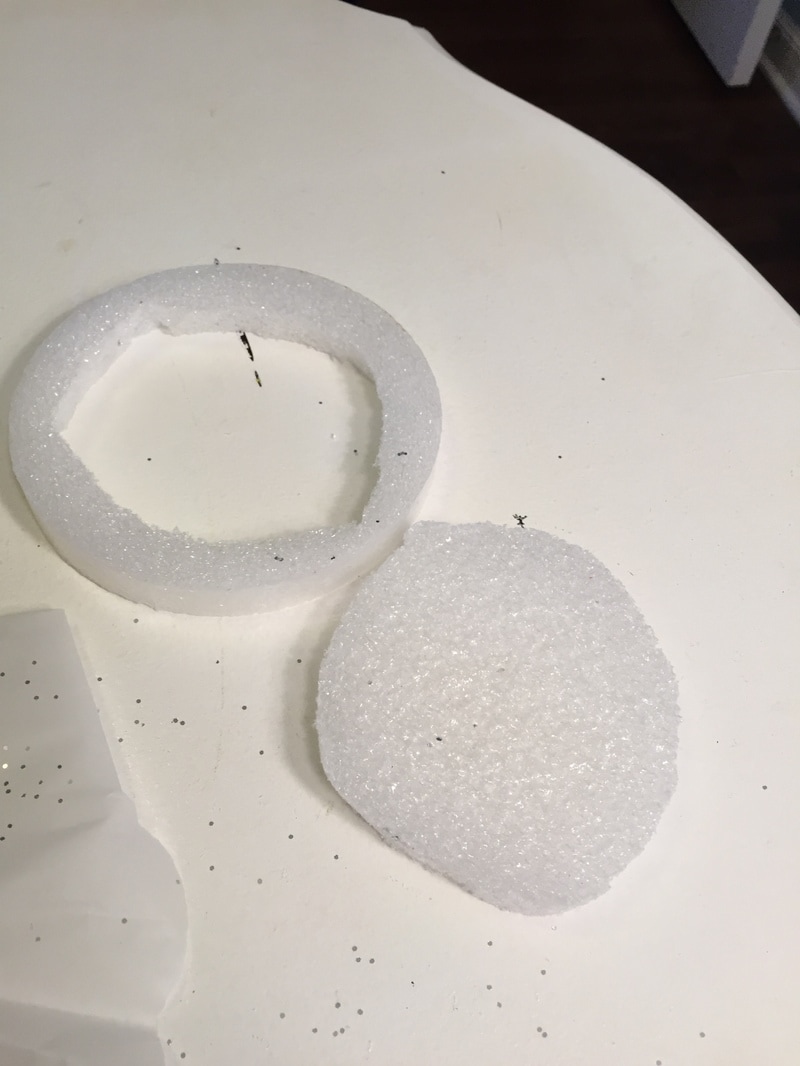
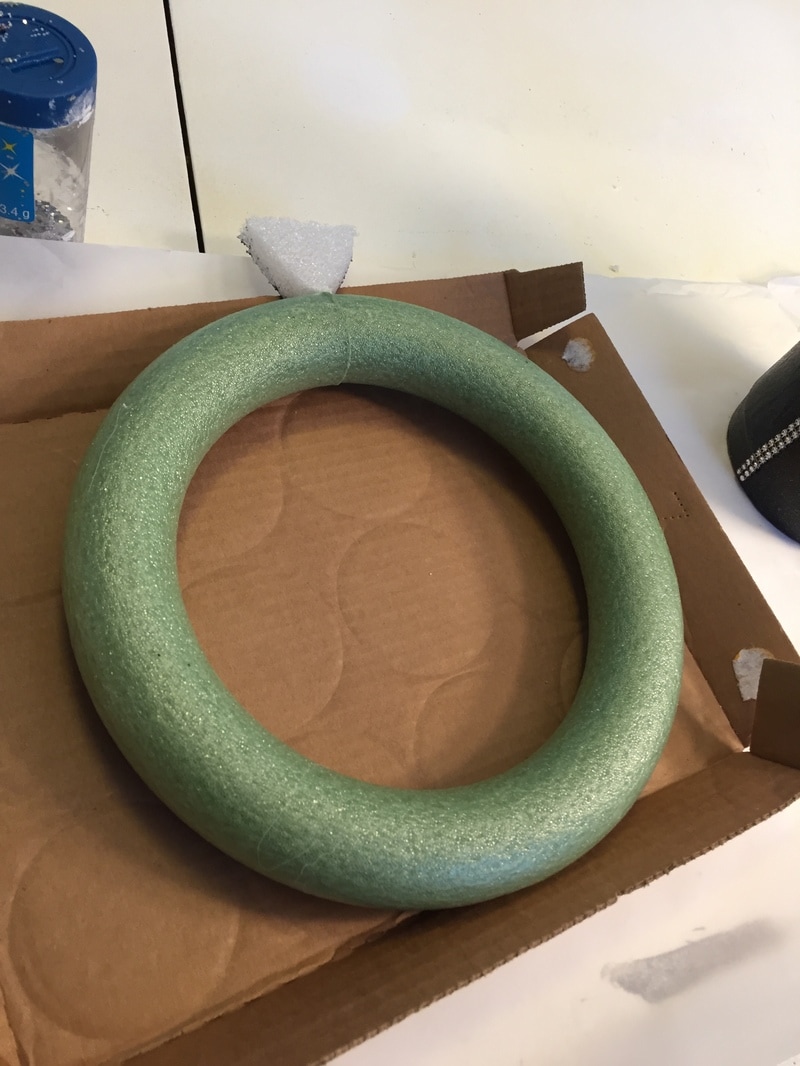 Start off with your ring laying flat. Using a cardboard box or wax paper will be very helpful when you start applying the glitter.  Next, you want to draw the shape of your diamond on your floral foam. Save the other piece from the two pack because you will use this later! 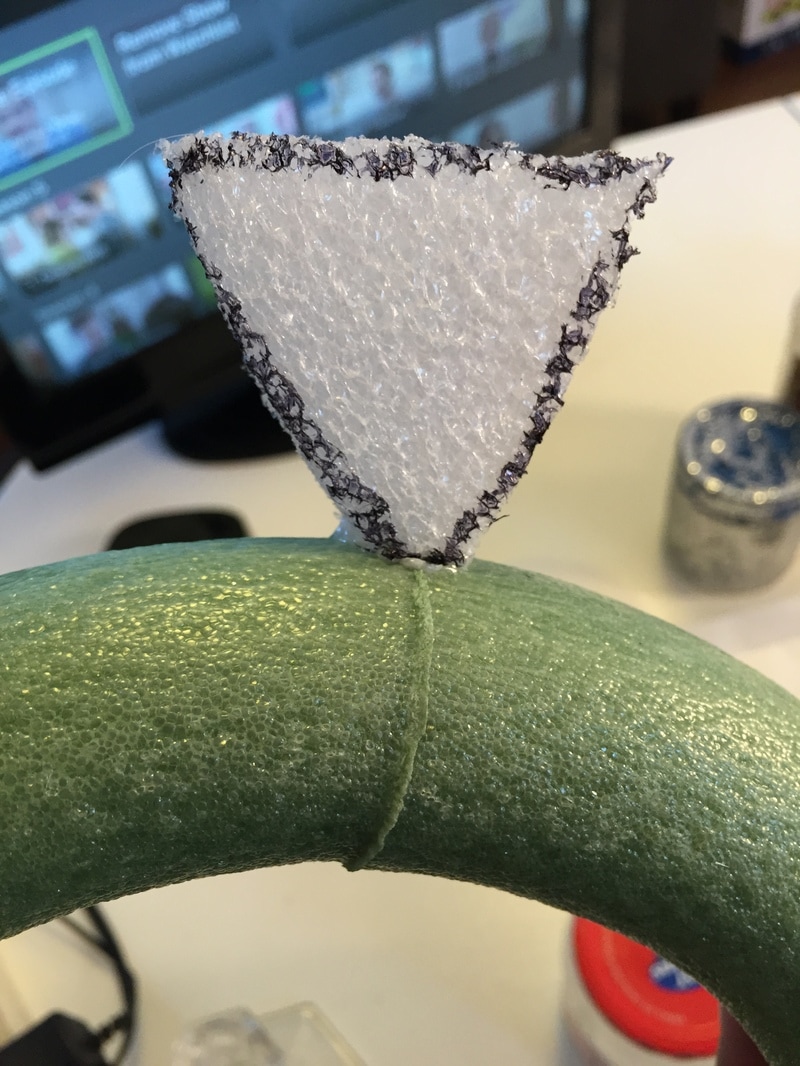 Use your E6000 to glue your diamond to your ring. 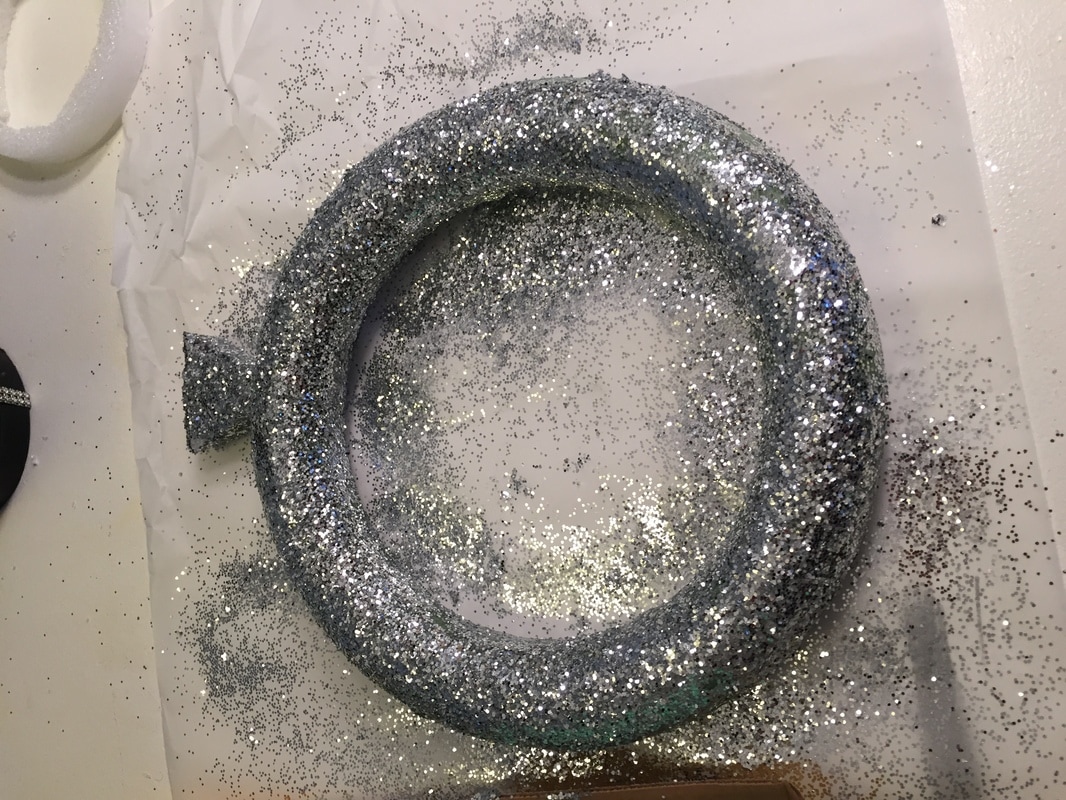 Apply glue to the entire ring and begin to apply your glitter. You will need to wait until your glitter and glue dries before you try to move the ring. 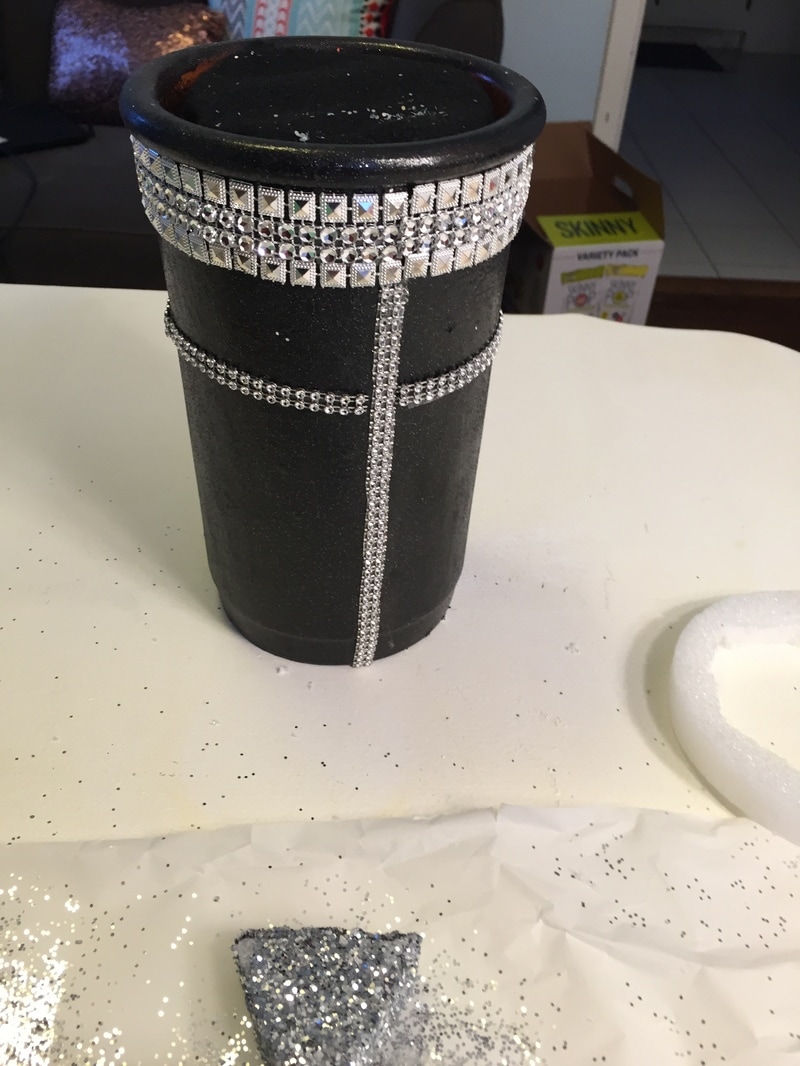 The Base:
 Next, you want to measure the inside of your vase/clay pot. You will need to cut your foam according to this size. Once this is complete, place your felt around the foam and tuck the felt into the vase. This will keep the foam in place. **** You will also need at least two straight pins to stick through the ring to the foam base. 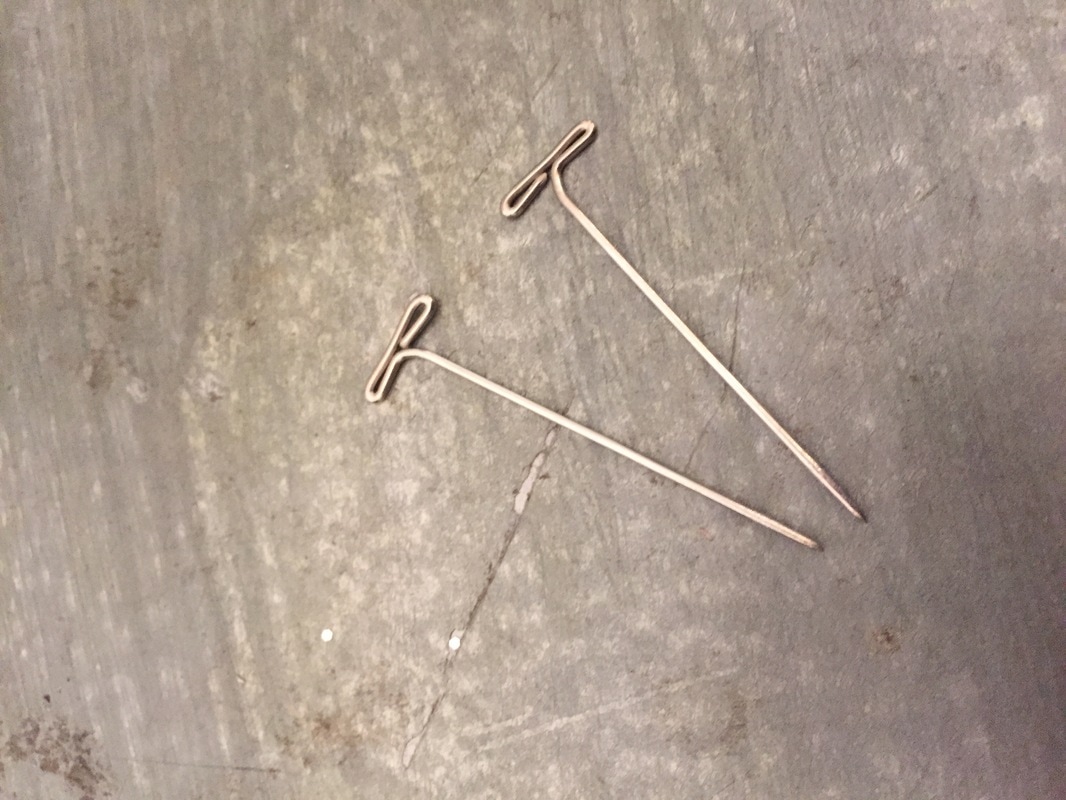 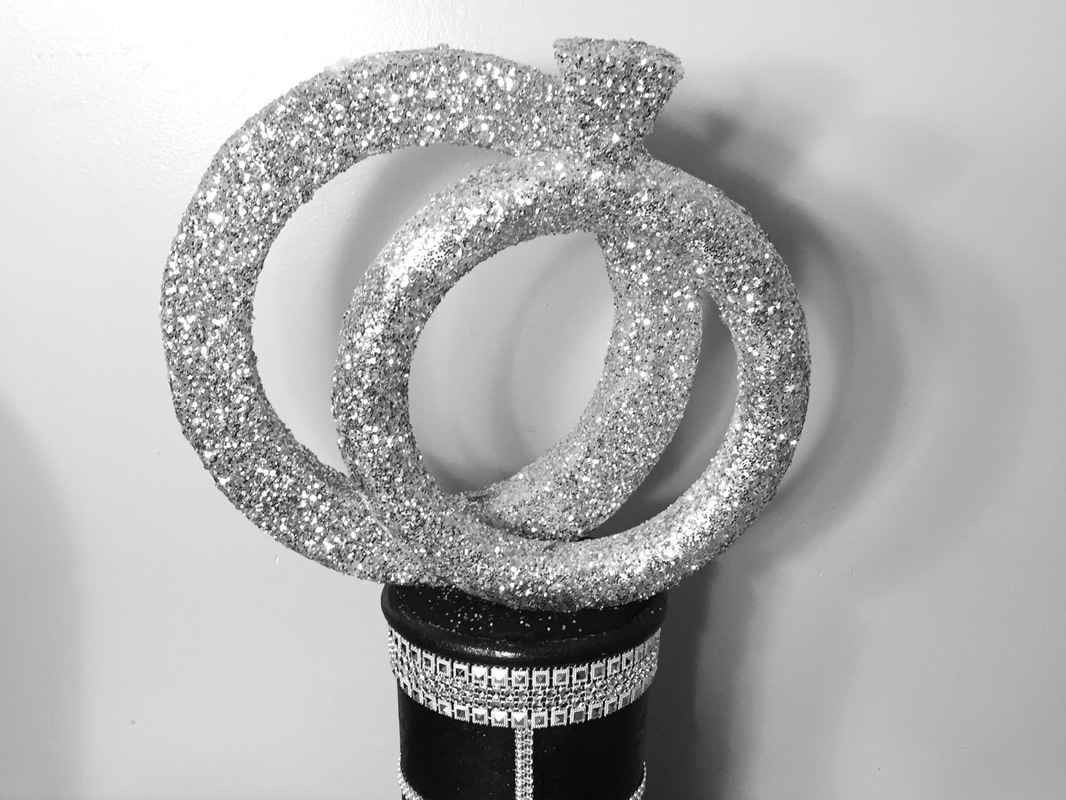 This will be your end result!!! Please let me know if you plan to do this. I would love to see pics. Hey guys!!! In today's blog I will be showing you the process of updating my terrible basement stairs. This was a long tedious process. Hopefully my tips will help you to make yours an easier process. I had so many ideas of how I wanted to update these stairs but ... I kept it safe and went with white. I originally wanted to stain the entire stair case but the wood was not the best even after sanding and removing layer upon layers of paint. Our house was built in 1955 and all the caked on paint showed that.  COST
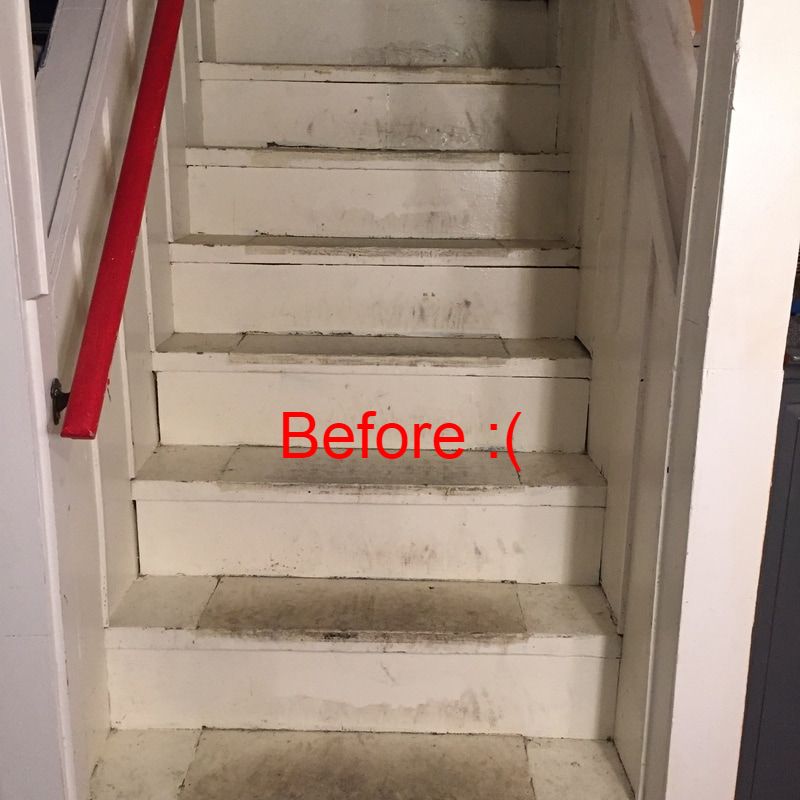 Yikes!!! Here are my terrible stairs. before. The outline that you see was were the treads . 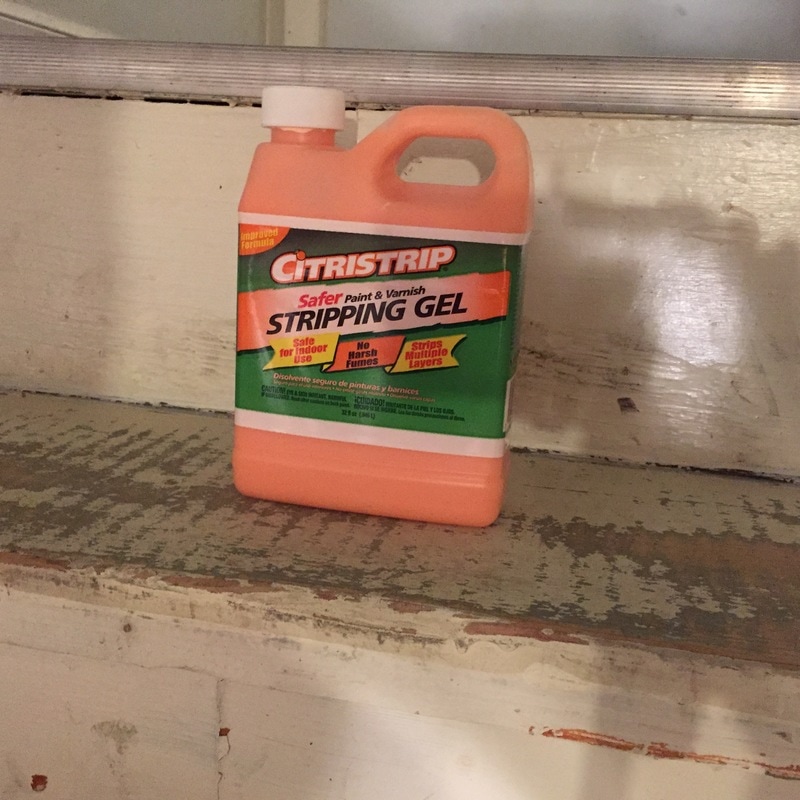 This paint stripper is like magic. You will need to apply it with a paint brush. DO NOT use a foam brush, the gel will eat through it. 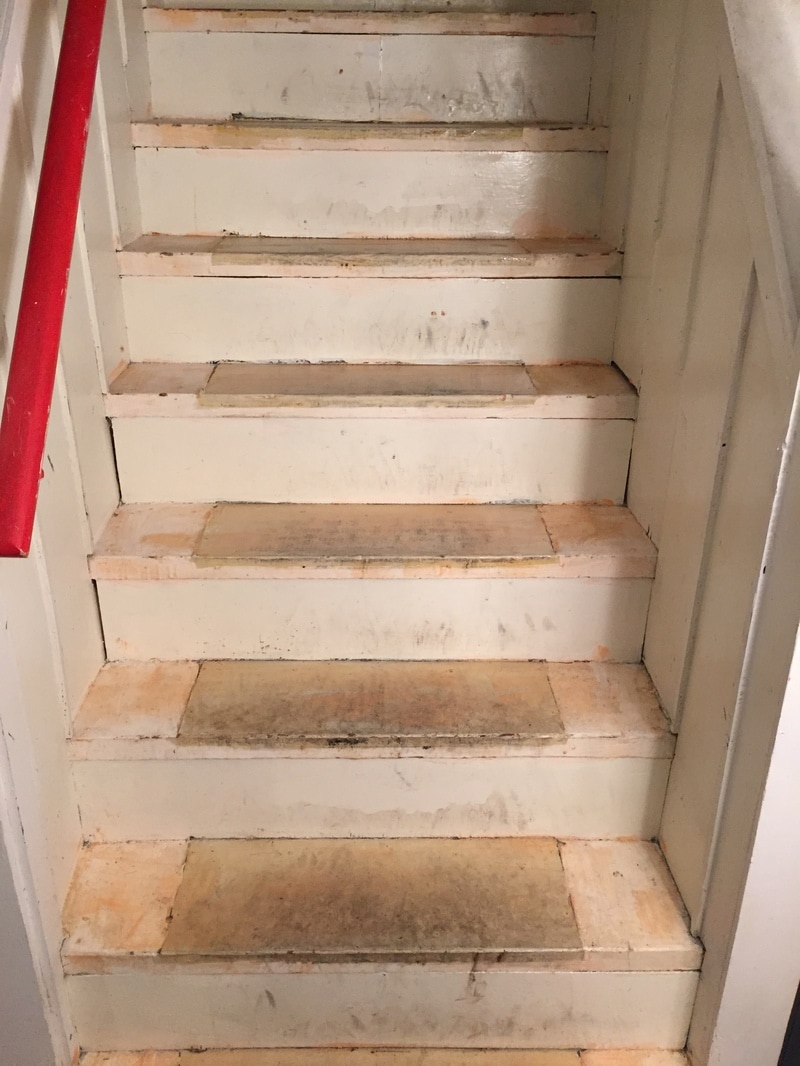 This is what it looks like once you apply the gel. We let this sit for 1 hour. 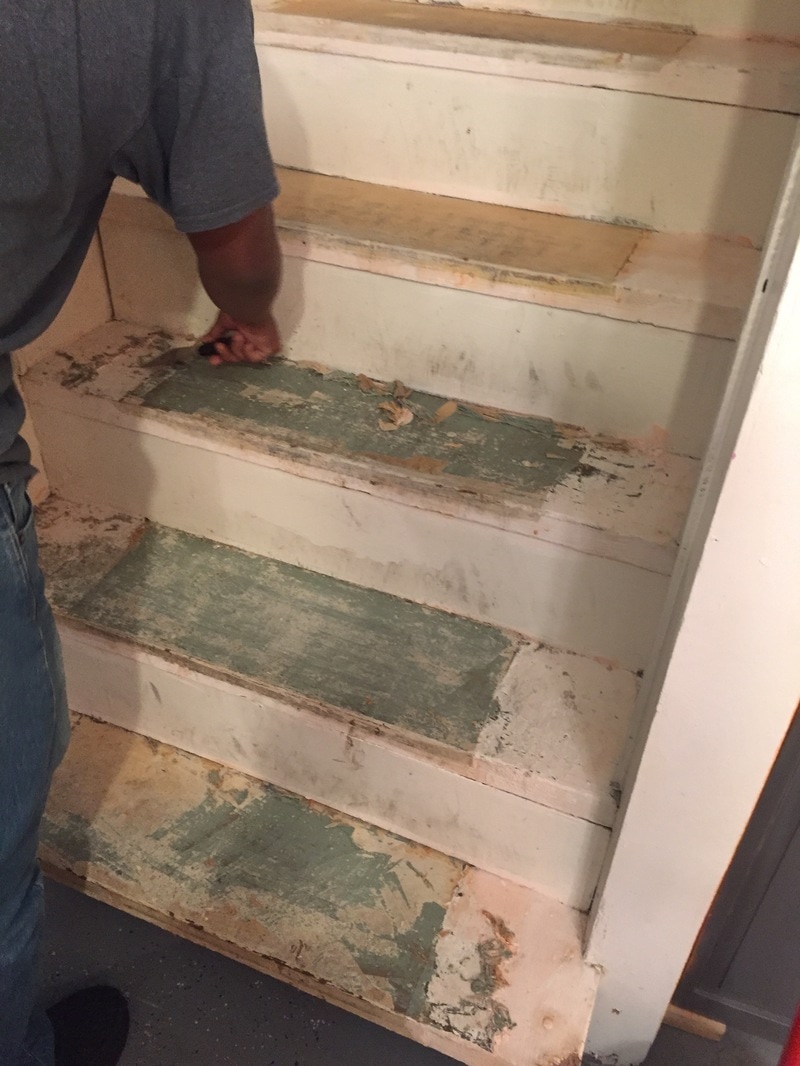 It comes off so easily. I will definitely be using this product for future projects. We did scrub the stairs down after we scrapped off the old paint. 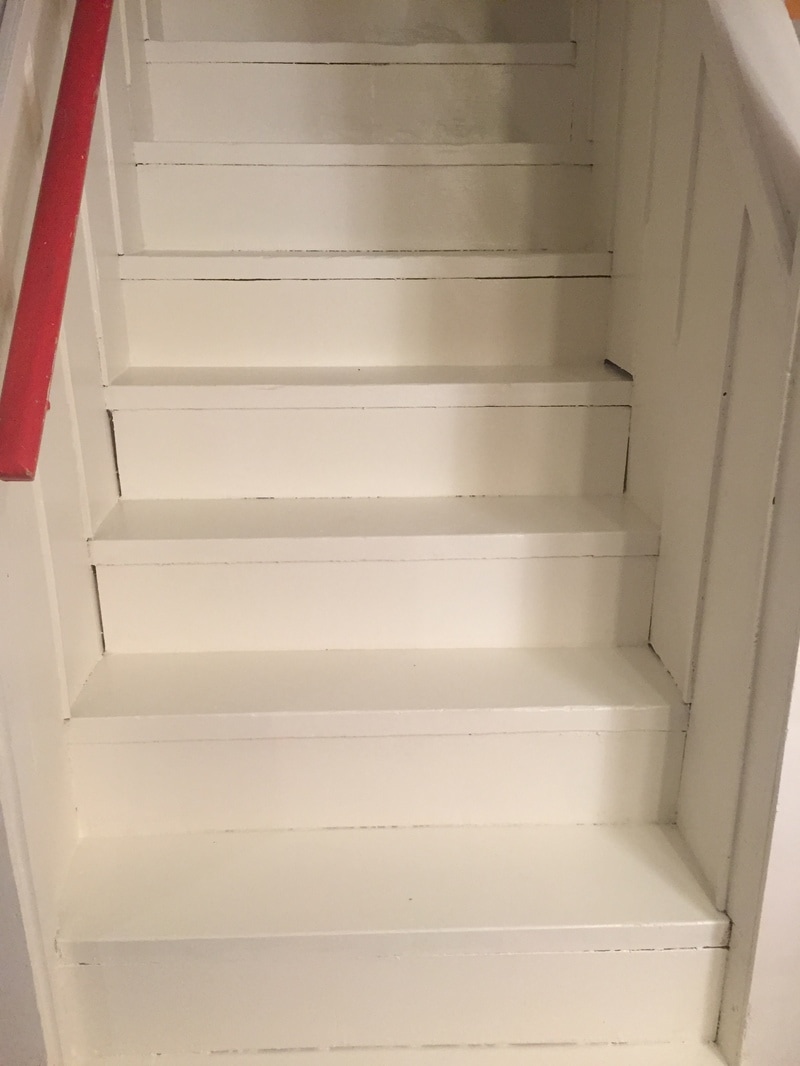 This is the After!!!!!!!! So much better. We are not sure if we plan to put the treads back on. Let me know in the comments below if you have ever considered painting your stairs.
Hey guys!!! In today's blog I will share with you how I turned a thrift store coffee table into extra seating for my home. Let's break down the cost first: Coffee Table $12 Fabric $10 ($5 a yard) Foam Cushion $20 (local fabric store) Paint $7 (1 quart) Total:$49 (not too bad) I would have paid triple if I purchased this brand new 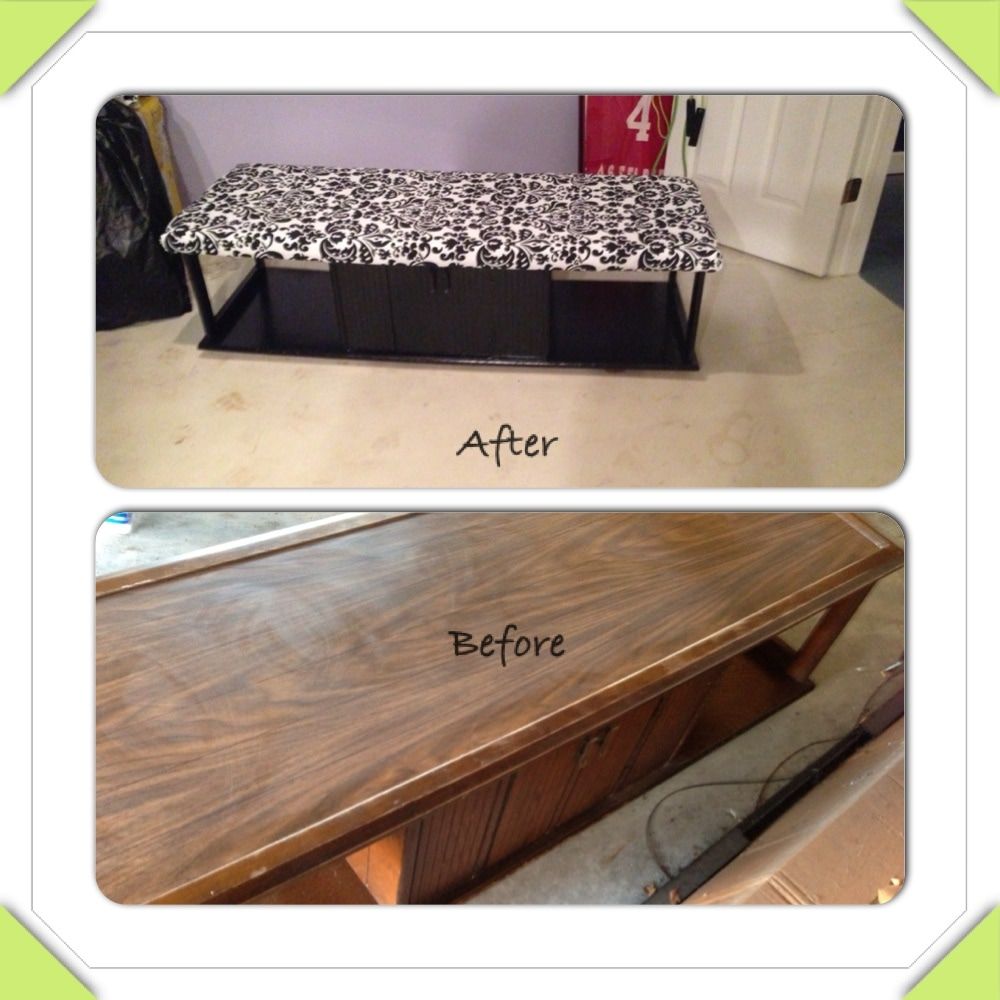 Here is the before and after of the bench. When I originally purchased this coffee table I knew right away that I would turn it into additional seating. I also loved that it had storage. 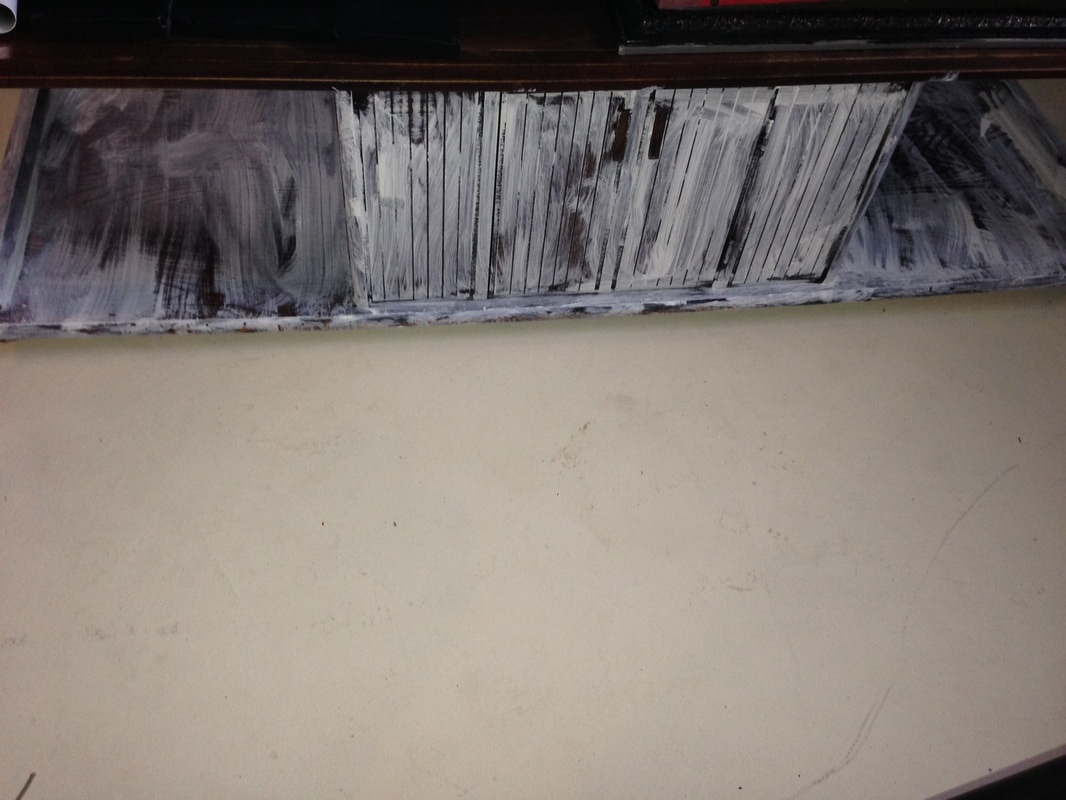 Here is my terrible priming experience. I actually had some primer that was on the brink of going bad. It was sticky and a mess. The frugal side of me did not want it to go to waste. 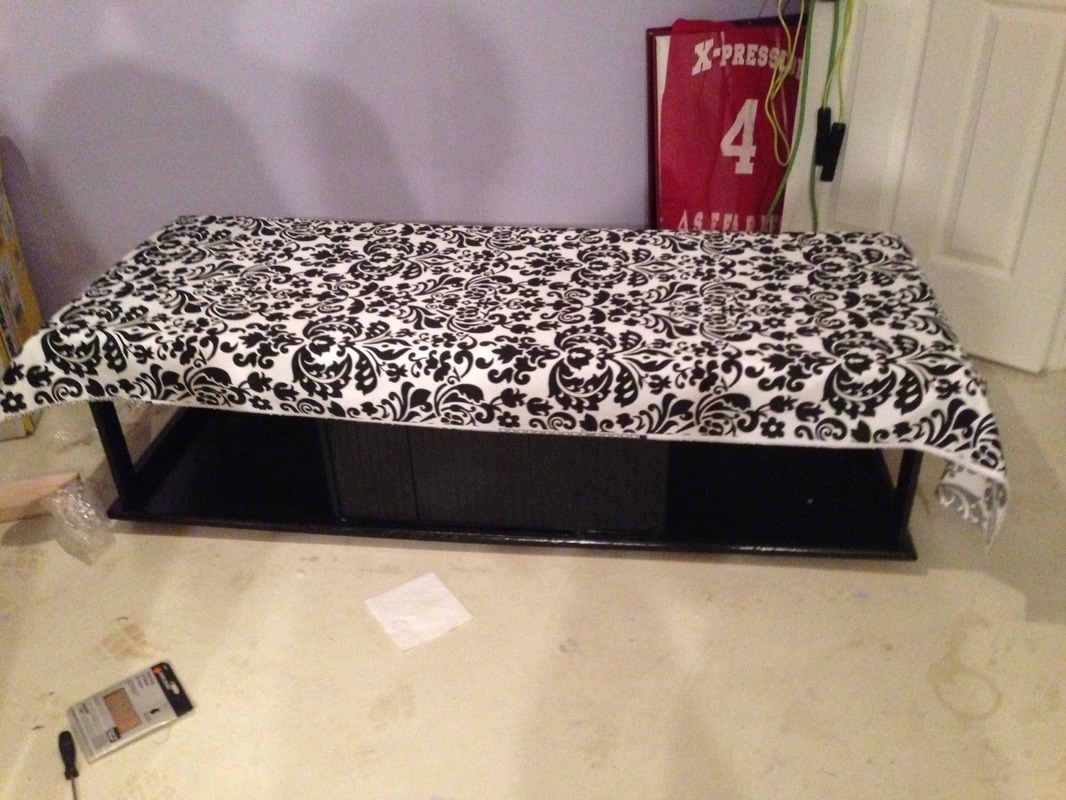 After you prime and paint the bench you want to work on your foam and fabric. 1. The first thing you need to do it cut your foam to fit the bench. 2. After you cut the foam down to size you need to place the fabric on top of it . In this photo you can see that I let the fabric hang over just a bit. This is because you want to pull the fabric tightly and staple it to the wood. 3. Make sure you staple all the fabric to the wood. I put at least 5-7 staples on each section of the bench. I wanted to ensure that it was secure. 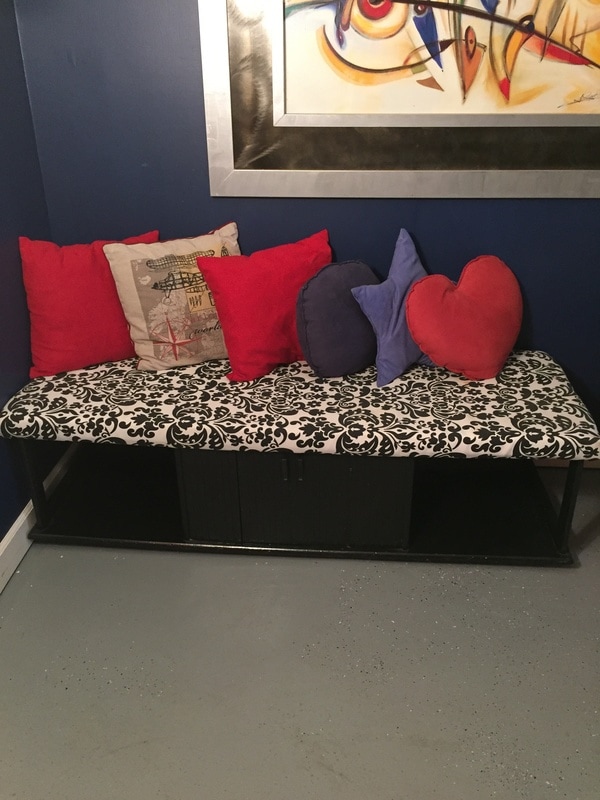 Here is the final product and for only $49!!!!!!!!!!!!!!! I will be putting wheels on this soon so that it moves about freely!!!
Would you guys do a diy like this? Share below! Hey guys!!! I have really been falling in the love with rustic home decor lately. I recently made over my living room. We had a coffee table that I previously covered with fabric because it had tile all over it, It was so terrible. My husband chipped away all the tile and added 1X4 to the table and we later stained it. It was easy and inexpensive. 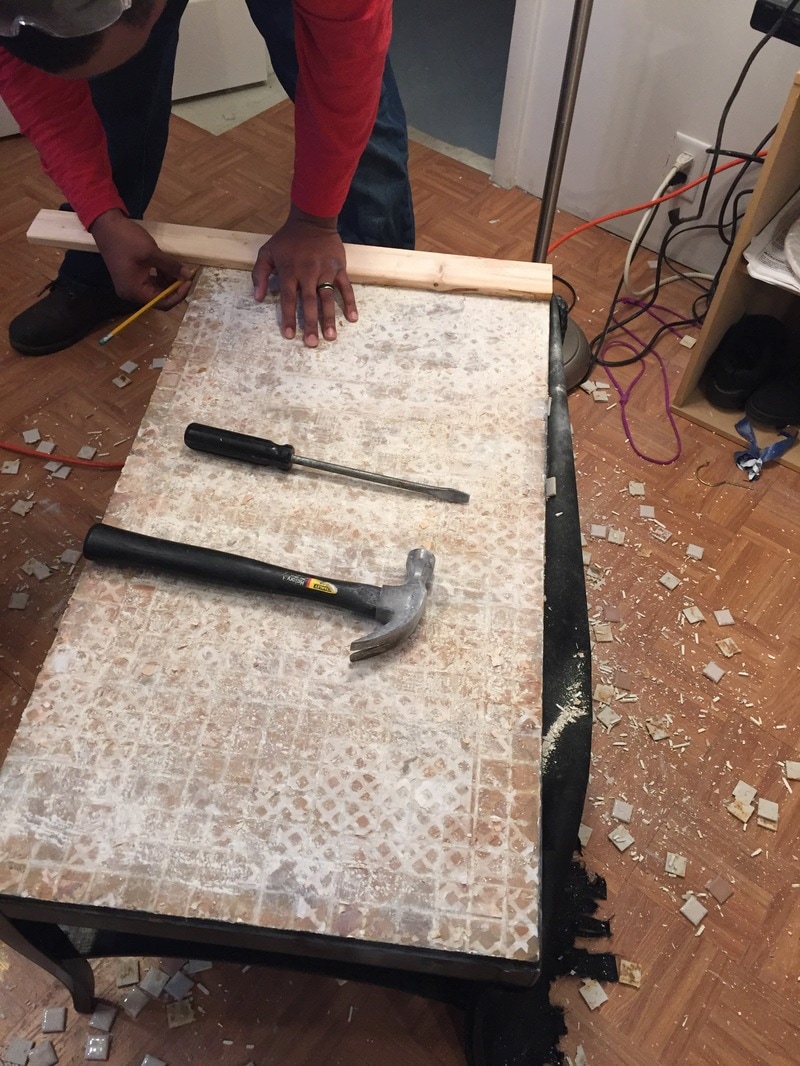 This is the before picture.... Such a mess. 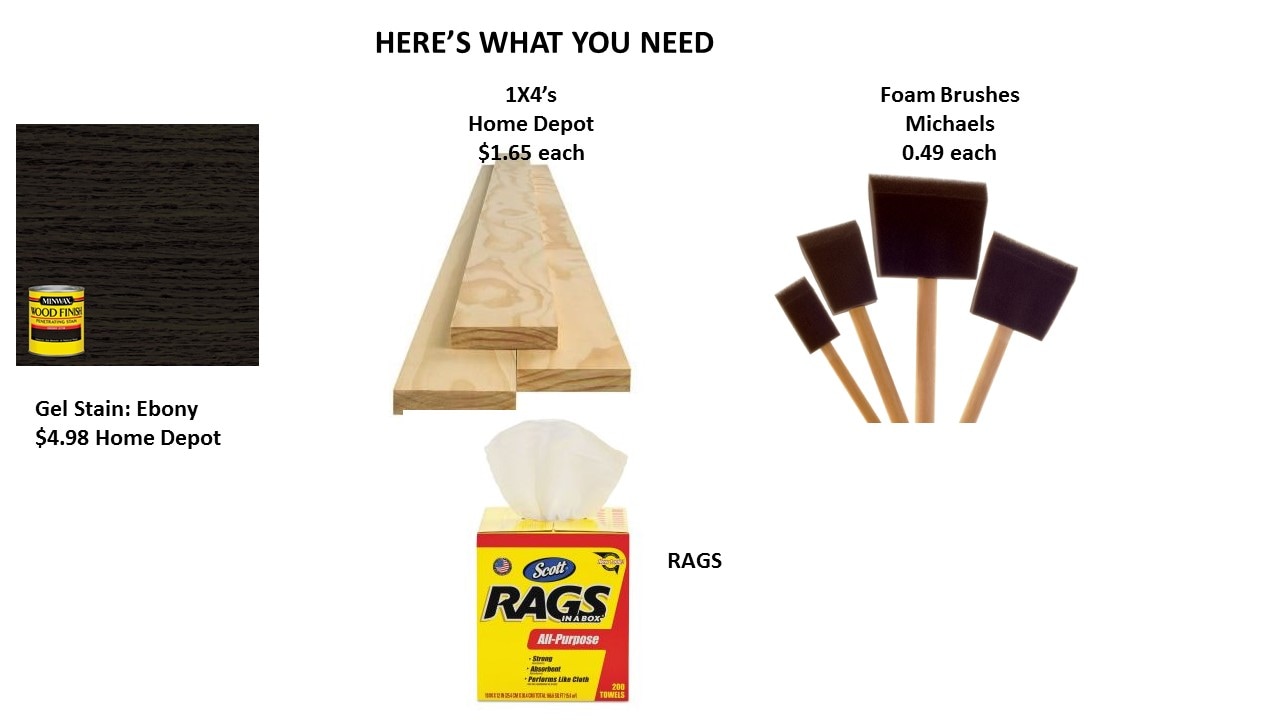 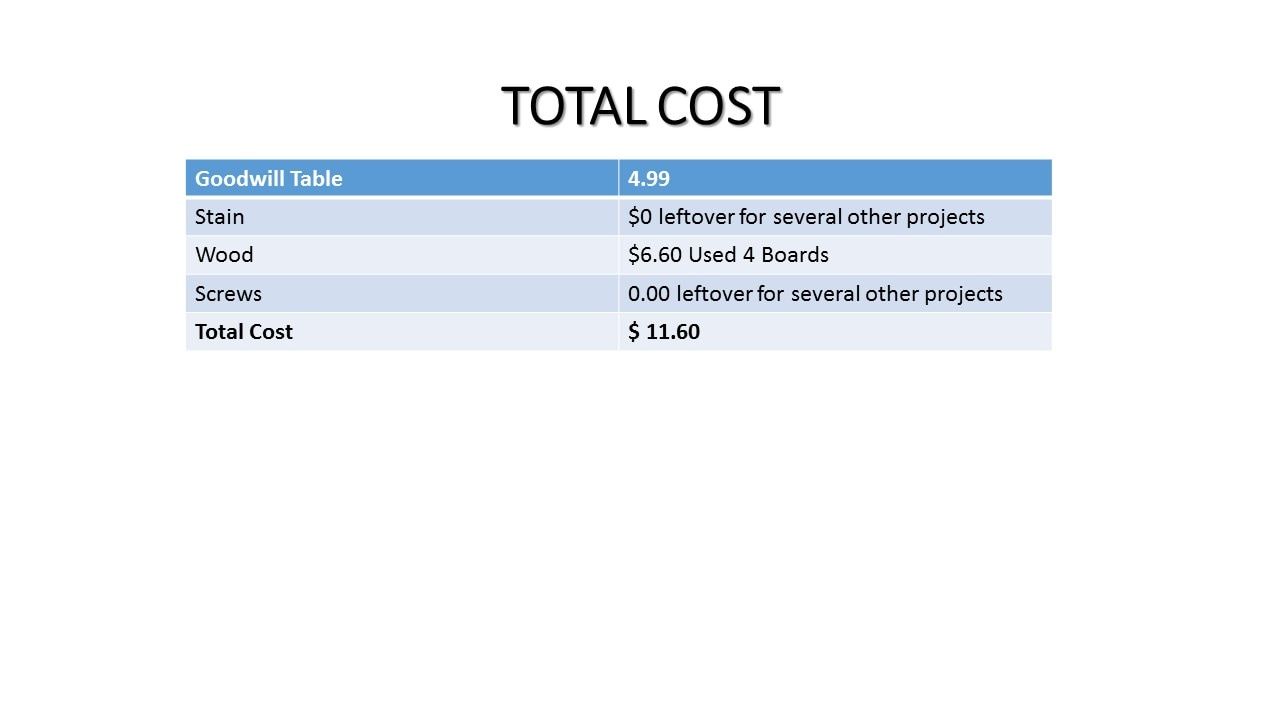 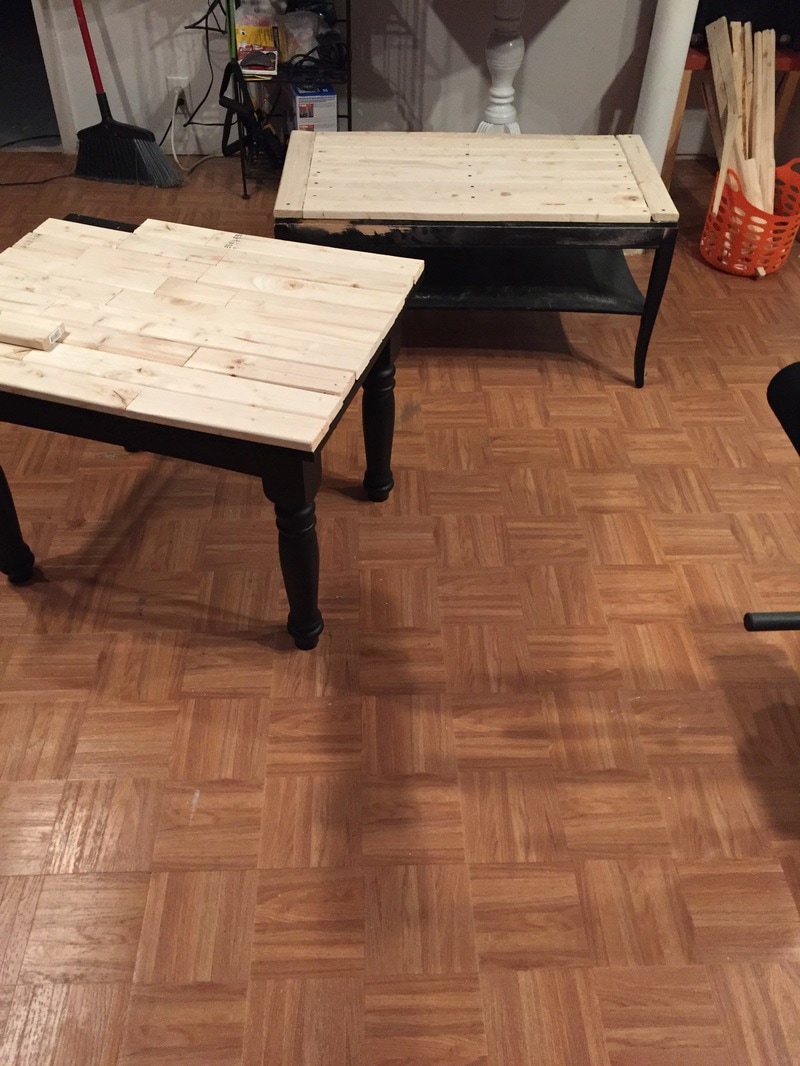 Here is a shot of two of the tables that we are making over. We used a miter saw to cut the 1X4's, It makes life so much easier! 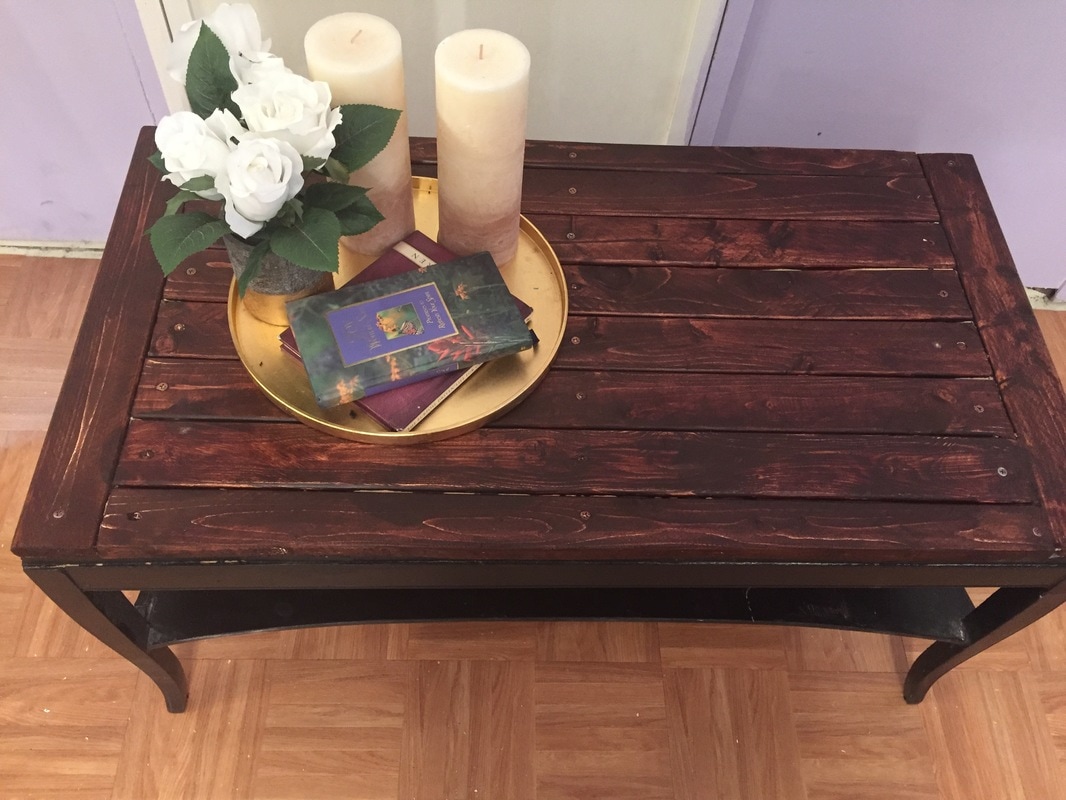 After we sanded the wood forever (maybe like 1 hour) we dusted it off and stained. You guys, I HATE sanding. It drives me insane but most of our projects need to be sanded. I am very please with the result and may sanded it a bit more. I think this would look cool with a distressed look.
Does this project seem simple to you? Would you try it? 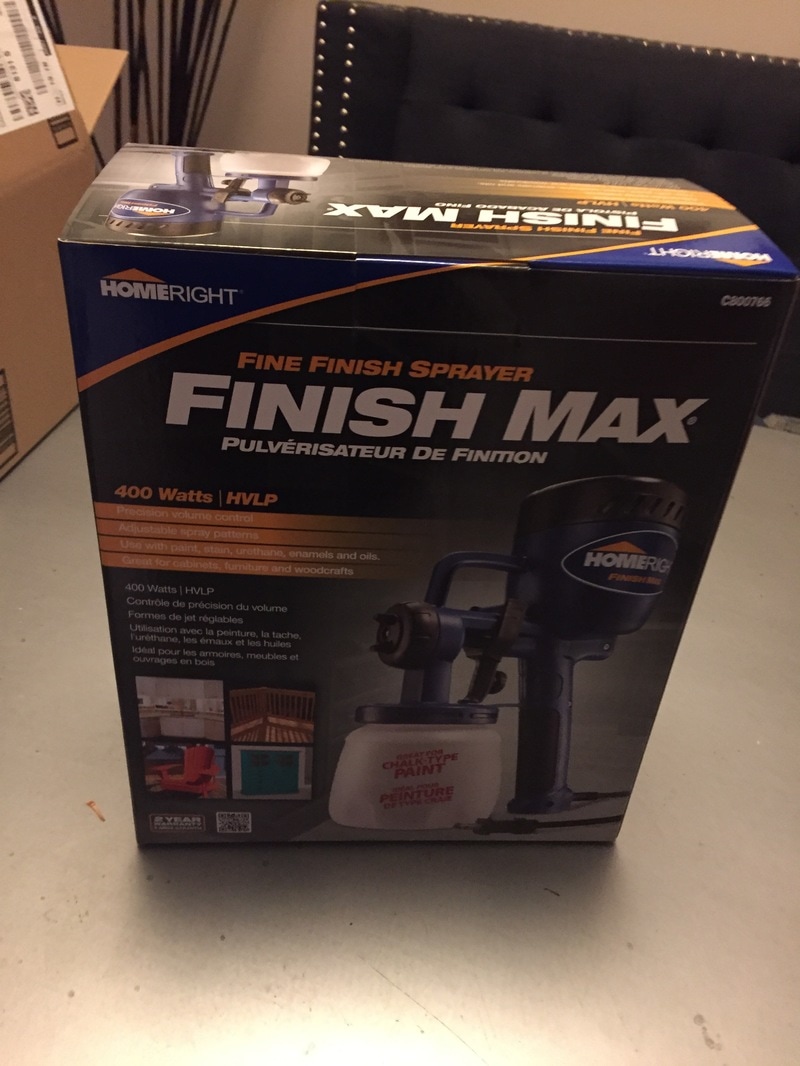 Hi Guys!!! So I got a new toy! I am so excited about this. I am so tired of painting with a brush for hours especially big pieces. I had painting as much as sanding. Sometimes it can be relaxing but most times I just want it to be over.
I purchased this from amazon for about $66. Not a bad price for a huge time saver. I came across this after I saw several people use it on Instagram. I looked at the reviews and they were really good. My Review: Its to early to say but I really like it. I sprayed to large pieces in less than 2 minutes. I was impressed by the horsepower in the motor. It was also really easy to clean. Check out my YouTube Channel to see it in action. See ya next time! 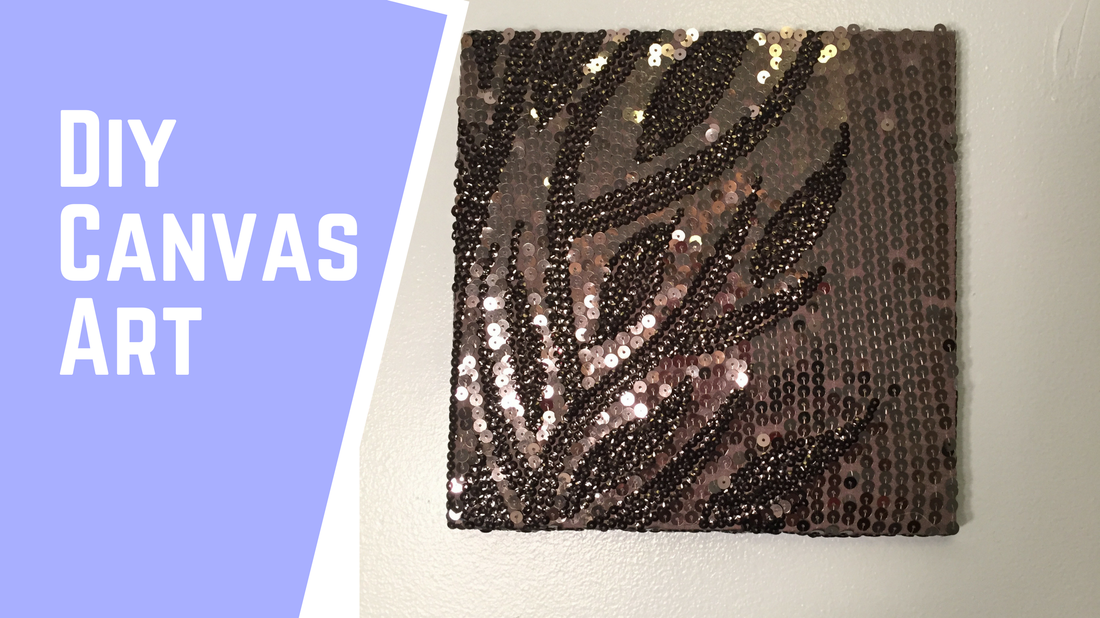 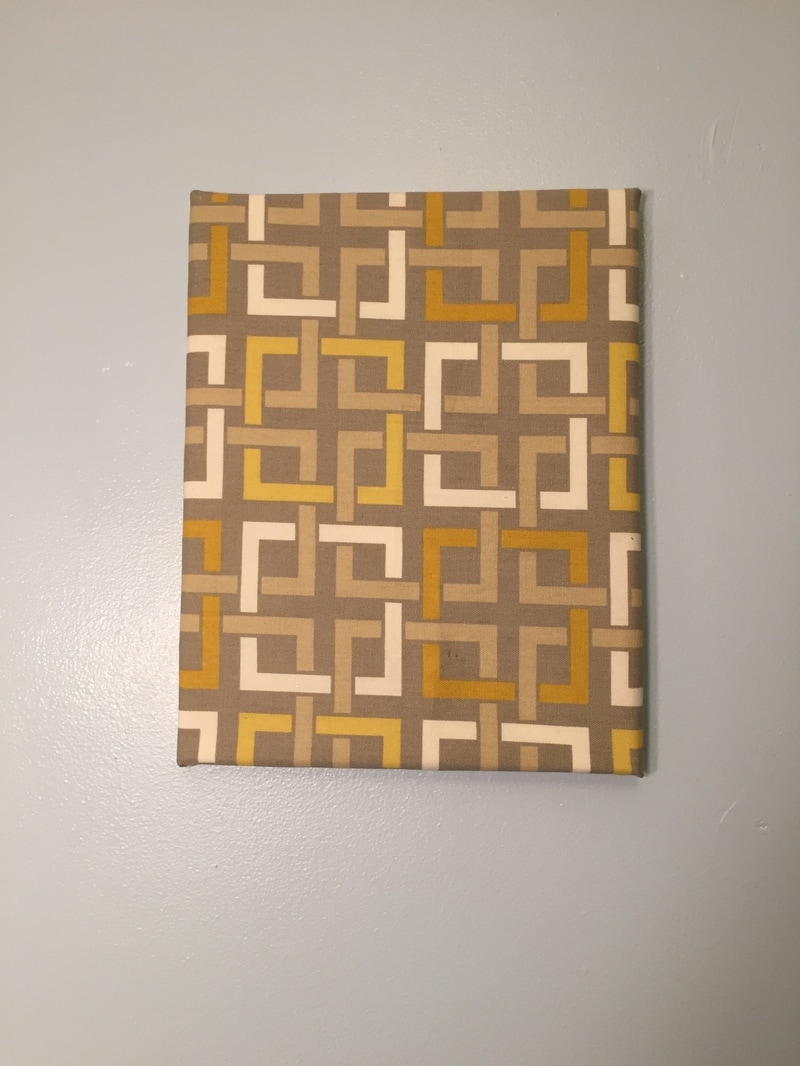   Hi guys! In today's blog I will share with you how to turn you old clothes into canvas art,
Here's what you need: 1. Staple gun or heavy duty stapler 2. Fabric (can be a shirt, dress, etc.) 3. Canvas or picture frame Step 1: Make sure the fabric that you are using is free from wrinkles. (Trust me it won't look pretty!) Step 2: Place your fabric around the canvas. Make sure it is centered if you are using a patterned fabric. Step 3: Pull the edges of the fabric as tight as you can. Once you have a tight grip you need to staple the fabric to the canvas. Step 4: Make sure you staple each corner of the canvas. Cut off any excess fabric. Step 5: Hang your new masterpiece!!! I hope you try this at home! Hey guys!! Happy New Year! I hope that you are well! It's been a while since my last blog! Life got really busy with the holidays but now I am back in full force. I wanted to share some exiciting updates that I have planned for my blog and YouTube channel.
Updates: 1. My husband and I are starting our own furniture business!!!! (I will be sharing more details soon!) We are super exicited and love to build together. 2. We plan to do more build diy's on our channel! It seems as though people really loved our sectional so we plan to do more of that. 3. We will be taking custom orders as well as flipping furniture. I will be listing all of the furniture for sale on this blog. Lastly, we would love to hear from you about what types of projects you would like to see. Feel free to leave comments below! Thanks for all of your support! |

Welcome!
Hi I'm Shani! I'm a newlywed that loves Jesus!! I am passionate about living a frugal life style, but still having a beautiful home on a budget, I will show you how to tackle different projects for those starting out with Diy. Archives
January 2020
Categories |
 RSS Feed